Homemade heaters for home, cottage and garage
 For recreation in the country in winter, a reliable source of heat (heater) is needed. It can be purchased from specialized stores. But there are summer residents who can easily design homemade heaters for the house, summer cottage and garage.
Not all summer residents and homeowners come to such a decision, but only those who have special skills and abilities. There are real self-taught engineers among them. They are able to calculate everything to the smallest detail, carefully handle every detail, having mounted an original safe heater.
The cost of material for a homemade device for heating the room is minimal, since it can be found on the farm. Even if you buy material for money, then it will cost much less than a device from a store, and the effect of the work is the same. Why then spend money on the purchase of ready-made equipment when you can mount it yourself. How to make a home heater with your own hands?
Homemade gas heater for garage, house, summer cottage
 When creating a heater with your own hands, you need to adhere to several recommendations:
- The device should have a simple design without complex elements and details.
- It is necessary to focus on safety, because devices that shut off and supply gas are best purchased from the factory, or removed from old cylinders.
- While creating gas heater you should also consider its economy.
- The heater should not be cumbersome, and the ways to activate it should not be complicated.
- The cost of materials for the heater should be no more than a third of the real price of the factory heater from the store counter, otherwise there is no point in making it, it is easier to buy a ready-made one.
As practice shows, the most effective way of heating at home is infrared radiation.
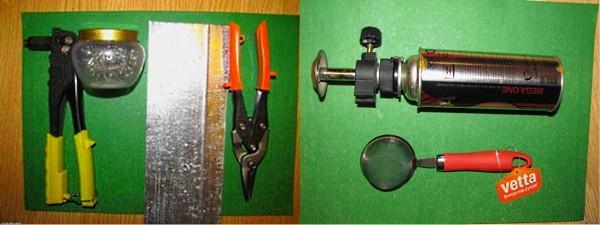
To make such a gas home-made heater for a garage, house, summer cottage with your own hands, you need a minimum of parts and material costs (sheet of tin, metal scissors, riveting machine, rivets, a metal fine mesh, a regular household sieve, a cylinder barrel with gas with a capacity of 0.5 l. and a special burner with a valve).
The first thing to do is fasten the heater to the burner. You need to take a household sieve, lean against a galvanized sheet and circle with a marker. Then, perpendicular and parallel, it is necessary to draw rectangular ears to the circle (one of them should be twice as long). Scissors for metal need to cut the pattern. It should be as flat as possible.

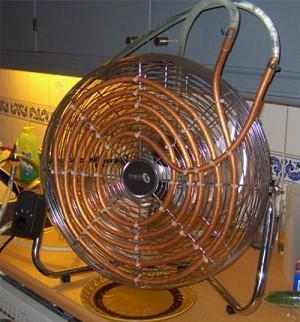
The second stage of the heater installation includes fastening the parts to each other. To do this, take the burner and bolt it to the tin circle. Then, with the help of the ears, which turn in the opposite direction, the strainer is attached. It helps dissipate heat around the sides. The result is part of the heater design.
The third step in mounting a homemade heater will be to attach the metal mesh. To do this, you need to cut an identical circle out of tin again. It is also cut with metal scissors. The ears are bent, and holes are drilled in the plane of the circle (about 10). Then the mesh is taken and attached to the ears of both circles. First you need to fasten the lower part, then the upper one. Fasteners are carried out using a riveter and rivets.As a result of these operations, a mesh cylinder should be obtained.
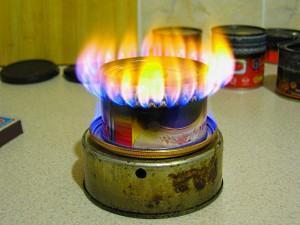
The final stage is the launch of an infrared homemade gas heater. Although it is not large, it radiates enough heat to heat a garage, a room in a house or a small country house.
DIY oil heater
Thanks to its impeccable functionality, performance and efficiency, oil heaters won great popularity among summer residents. They are safe and compact, and have a high level of efficiency.
The device of a home-made oil heater is very simple: a sealed housing with oil (any gas cylinder or other sealed container can do), around which electric tubular heaters are wrapped.
To make an oil heater, you need the following materials and tools:
- Hermetic container (radiator from the car, metal or aluminum battery).
- Transformer or technical oil.
- 4 heating elements.
- Low power electric motor or pump (up to 2-2.5 kW).
- A set of drills, drill, welding machine, electrodes, switches.
The process of installing an oil heater at home proceeds according to the following scenario:
- Frame installation. The frame needs to be made so that it is transportable and easy to use, it is also worth considering the way it is stored in the warm part of the year. The corners are welded together using a welding machine.
- Holes for installation of heating elements. The holes can be made with a grinder or welding, and best of all with an autogenous one (if it is possible to get it).
- Mounting a pump or motor. You can install a motor or pump directly on the heater body or on a frame. It is necessary to ensure that the pump does not touch the heating elements.
- Fastening of heating elements. The heating elements are installed on a previously prepared place using bolted connections.
- Tightness. To achieve tightness, all holes must be welded. For more convenient use of the heater and emergency draining of liquid, you can mount a cover that would be screwed to the body.
- Connecting heating elements. They need to be connected in parallel (this is how the heater will work effectively). You can select the desired temperature using the regulators.
- The oil heater is almost ready. It remains to assemble everything on the frame and ground the entire device.
Do-it-yourself oil radiator will be an excellent and effective heater for home and summer cottages. Its only drawback is dependence on electricity and its high consumption.
DIY electric heater
If you make an electric heater with your own hands, the basis of its work should be infrared rays, which heat not the air, but the objects in the room. Thanks to this principle, even a homemade electric heater will be effective. In addition, electricity consumption is minimal.
To make an electric heater, you can use two plates of plastic and graphite shavings. The owner will get an aesthetic, flat device that will harmoniously fit into any interior.
A graphite heater is made in the presence of graphite chips (you can use old, used tram brushes), two sheets of plastic (1 m each2 each), epoxy glue, a piece of wire with a plug at the end.
- First step. It is necessary to grind graphite if there is no ready-made graphite powder. The amount of powder affects the efficiency of the heater, so there should be enough.
- Second phase. The graphite powder is mixed with epoxy adhesive. As a result of this action, an excellent graphite conductor is obtained, which has great resistance.
- Stage three. The resulting composition of graphite powder and epoxy glue is applied in zigzag wide lines to one of the plastic plates.
- Fourth stage. Using the same epoxy adhesive, attach the second plate from the top.After drying, the resulting structure can be placed in a wooden frame. This will make the heater more durable.
- Fifth stage. Copper terminals are attached on both sides of the heater. Wires with a plug are connected to them.
- The final stage. The device is ready for use. You need to plug it in and check if it works.
A homemade electric heater is the most efficient and convenient way to heat a room. Many summer residents are often interested in the question of how to make a garage heater with their own hands? For a garage, you can make a heater according to the same principle, only the plastic plates need to be taken smaller, about twice. This will be enough to heat a small garage.