How to install a fountain with your own hands in a summer cottage
The real pride of each summer cottage will be a fountain, which is not easy to build with your own hands, but it is possible. The structure will serve as a beautiful addition to the site and will create a comfortable climate on hot days. Cool down near the fountain, where every guest or inhabitant of the house will always want to be humid and fresh. It will be possible to independently make a garden fountain with your own hands if you understand the main features of the construction process.

Preparatory stage
Before installing the structure, you should first determine its location. It is important to individually think over the design of the reservoir so that it fits well into the landscape of the existing site. If the size of the land area is large, then in the process of installing the fountain with your own hands, you can give preference to massive sculptures and decor. For a small standard plot of land, it is best to choose a compact bowl and composition.
When decorating a fountain with your own hands, you should take into account the type of landscape you already have:
- Modern garden. When arranging a site, preference should be given reservoirs, decorated with natural or artificial stone, concrete or metal structures, as well as glass. A pond with threadlike water jets will complement the minimalism style.
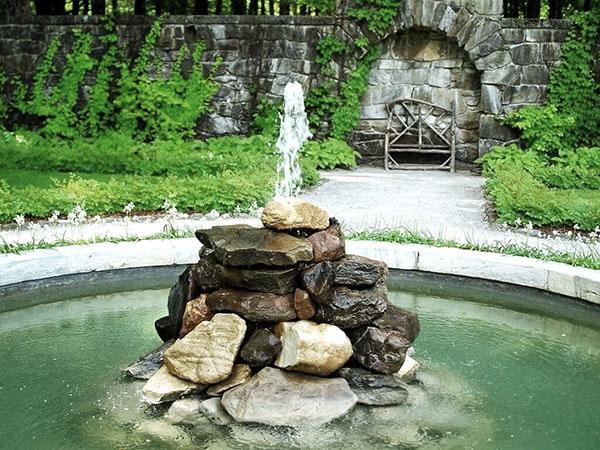
- Natural garden. The fountain has the most natural design, so the materials for its decoration are appropriate. It is decorated with pebbles, stone or wood. Often, a fountain is made under a spring, where water flows out through a pile of stones.
- Country. Most often, the fountain is decorated with clay boulders and jugs, as well as a mill wheel.
The design of a classical garden, which is complemented by antique sculptures, is considered the most difficult to execute.
When constructing a fountain with your own hands, it is important to determine as correctly as possible its location. It is not recommended to install the structure near trees, since the leaves in this case will begin to actively pollute the reservoir, and the roots of plants can damage the bowl. It is also not worth building a fountain in a place where the largest amount of the scorching rays of the sun falls, because the reservoir will begin to bloom faster.
It is important to think over a place with access to electricity, since the pump will work from the mains.
It is recommended to pay attention to the height and strength of the jet in the pond, whether it is a conventional design or a fountain for a pond in the country. Water should not hit the walls of the house and garden furniture... Otherwise, the fountain will only ruin things and the surface. Water jets should be at a distance of 50-100 cm from other objects.
Work stages
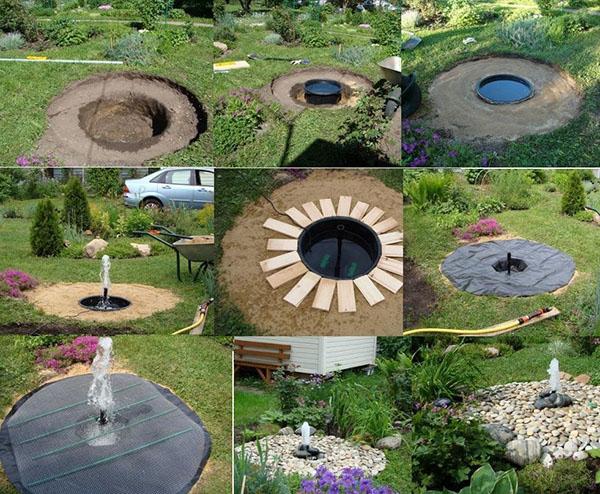
At the initial stage, at the selected site:
- A pit breaks out under the bowl of the fountain. The pit should be slightly larger than the bowl itself.
- Additionally, a gutter is pulled out around the container, the depth and width of the recess should reach 10 cm.
- Then a sand cushion is prepared and the foundation pit is filled with sand, the height of which should reach 15 cm. Thanks to the sand cushion, the fountain bowl will not deteriorate against the root system.
- Before moving on to the next stage, the sandy surface is carefully leveled.
The second stage of installation of the structure begins with the installation of the fountain tank. With the help of a building level, the bowl is fixed, and then the sand is poured and carefully compacted.At this stage of installation, it is important to ensure that the surface of the bowl protrudes 7 cm from the ground.
Types of pumps

Before making a fountain from improvised means in the country, you should think about which pump will be used. Installation submersible pumps is carried out directly in water, here the liquid enters through the filter to the nozzle. It is best to mount the pump on an elevated position so that the filter becomes less clogged during use. Submersible pumps are preferred due to the fact that they operate quietly, are very easy to install and are quite compact.
Installation of surface pumps is carried out on land, the device sucks in liquid, and then pumps it through a hose through a filter and releases it into the fountain. The device is rather complicated to install, and its price is higher than that of a submersible pump. The main advantages of the device are ease of use and reliability of the design itself.
Do-it-yourself fountain in the country without a pump
Having decided to build a reservoir where there is no pump, you should give preference to open-type fountains. When preparing the device, the water pipe is brought into the pond, or the liquid is supplied from a well that is on the site. In this case, the liquid flows well under pressure, due to which the desired jet height is formed. A tip is installed at the end of the pipe, and the water is returned back to the river, well, or to the area for irrigation.
Organizing a fountain with your own hands, where there is no pump, will work in another way. A container is fixed at a height, liquid is poured into it, after which water flows through pipes into the fountain. It will be easier to achieve the desired jet height in the reservoir if the container is raised to a height of 3 m or more. Water will be supplied to the container using a non-submersible pump.
DIY fountain from an acrylic bath
It is not necessary to buy a specially bowl for preparing the structure if there is an old acrylic bathtub available. Before starting work, you will need to select stones of a suitable size, a bath, earth, a circulation pump, a metal sheet, as well as decor. At the final stage, decorate the fountain with sculptures, lamps or plants. If you first prepare the scheme of the fountain device, where it will be written in as much detail as possible, this will facilitate the task.
The entire stage of work proceeds according to the following scheme:
- A recess is pulled out in the ground to fit the size of the bath.
- Oval or round stones for the fountain are selected.
- The bath is being installed, the drain hole is carefully clogged.
- Wide sheets are cut from metal, which are installed along the perimeter of the structure. They protect the rest of the territory from unwanted drops and are additionally decorated with stones.
- The bottom of the recess is neatly lined with small pebbles, if lighting of the fountain is planned, then it is prepared at this stage.
- A circulation pump is mounted, the container is filled with liquid. The structure can be decorated to taste.
Complement the composition from above with sculptures and natural stones from above.
DIY stone fountain
Making such a small fountain is not difficult. Before starting work, you should purchase a bowl for the structure itself.
The entire installation process includes the following stages:
- A deepening is being prepared in the ground 5 cm larger than the fountain capacity itself. Additionally, a ditch is thought out to the outlet.
- A pillow 5 cm high is prepared from gravel.
- A bowl is fixed in the ground and a PVC pipe is installed. These two elements must be connected, and then the ditch must be covered with earth.
- A pump is mounted in the bowl, and the outlets are prepared.
- The bowl must be additionally connected to a copper pipe, backfill the bottom of the structure with gravel and fix the pump.
- Additionally, the bowl is fixed in the ground, the container is closed with a net, and slats are placed on top of it.
- Holes are prepared in each flat stone with a drill.After that, the stones are strung on the pipe one by one.
- The fountain decor is in progress.
DIY concrete fountain
It will be possible to prepare a fountain from a concrete bowl if you secure all the necessary materials. First, a pit is prepared with a depth of 60 cm. Then the bottom is laid with a crushed stone pillow. Prepare the walls of the fountain with brickwork, which will take some time to complete.
The pump is being installed, the device is connected to the network and the water supply source. It is very important to check in advance how the structure is functioning and to adjust the power to achieve the desired jet height. At the final stage, a fountain from a gasoline pump or with any other system is decorated with pebbles, stones or statues.
The reservoir on the land plot will last much longer with proper and high-quality care.
In winter, it is recommended to drain the water from the container and remove all parts that are being dismantled.
Even if the structural parts can withstand severe frosts, dismantling will extend their service life. Do not forget to cover the bowl during the period when it is not working. With the help of the film, it will be possible to protect the tank from dust and precipitation. The most inventive owners of a summer cottage manage to save money by installing a solar-powered fountain with their own hands.
Photos of unique garden fountains