One of the stages of installing the stairs is the installation of balusters
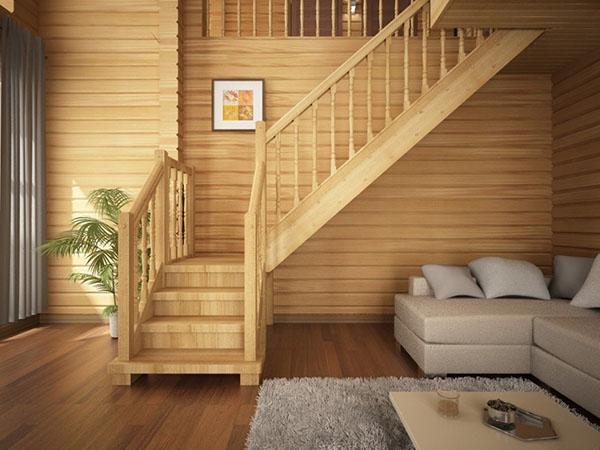
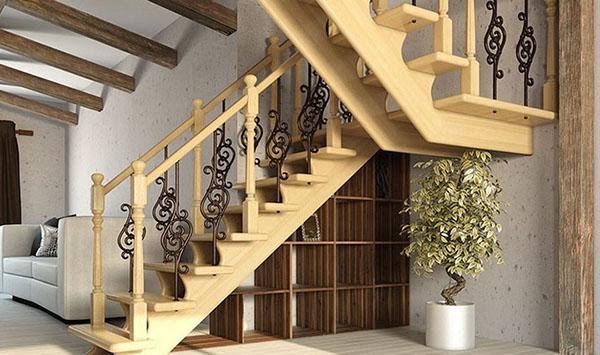
For the final design of the stairs, the installation of the fence and railings is carried out. The installation of balusters helps to do this. Outwardly, they are racks that support the railing. They can be made from various materials, and their appearance depends on the style of the building and approaches to interior design.
Determination of the number of balusters and the frequency of their location
The fence for the stairs is made up of support pillars, railings and balusters. These are key design elements.
Their number is determined taking into account the following factors:
- material for making the stairs itself;
- railing material;
- the complexity of the design (the length of the flights of stairs, the number of turns);
- room style;
- visual aesthetics of the structure.
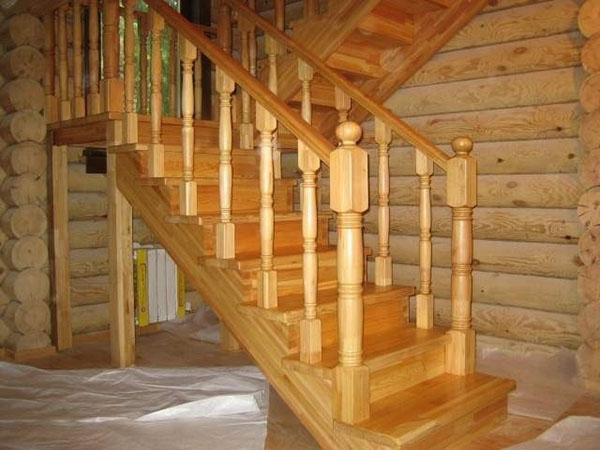
Pole balusters are vertical supports between the surface of the steps and the railing. Railings are inclined or horizontal elements that are designed to be gripped by hand.
All details of each group should be combined with each other, making up a single composition. The elements are manufactured in advance according to individual measurements, installation is carried out on site.
In order for the staircase to be safe for children, it is recommended to maintain the distance between the balusters within 10-15 cm. Regardless of the number of posts and balusters, their installation should be carried out in a straight line. For elements with a significant volume, their centers are set along this line.
There are several options for the frequency of the location of the posts for support:
- on every step;
- through a few steps;
- only at the beginning and at the end of spans.
Some stair balusters serve only a decorative function. They are thin, graceful elements that are not designed for a serious load.
The thinner the balusters, and the less load they can withstand, the more posts are needed.
Installation of balusters: phased implementation of work
In order to correctly fasten the baluster to the step, a preliminary calculation is performed and the marking is performed. As a rule, the center of each baluster is located at a distance of up to 10 cm from the edge of the step.
You can calculate the installation site according to generally accepted rules. For this, the diameter of the lower section of the baluster is divided in half and the distance is added, which should remain free between the part and the edge of the step. For a square section, the length of the side is included in the calculation.
Stage 1. Markup

The marking process involves drawing a line on the steps of the stairs, on which the centers of the pillars and balusters will be located:
- For each span on the upper and lower steps, markings are made taking into account the shape and size of the stair railing elements.
- A straight line is carried out, which plays the role of a reference point for the installation of balusters.
- Directly on the steps themselves, a line is drawn, which is central for the installation of elements.
- Marking the location of the pillars.
- Marking the location of the balusters.
The difference in the pitch of the position of the support post for the ladder and the baluster should not differ by more than 0.01 m from the step between two adjacent balusters.
The definition of a straight line between the top and bottom of the span can be done in several ways:
- With a laser.
- By pulling the thread.
- Installation between two marks of a long bar.
Stage 2. Installation
How to install the balusters is determined depending on the material of the steps and the elements of the fence. Most often, metal or wood is chosen as support pillars and balusters. Installation can be done in several ways.
The nuances of using metal
Installation of fastening metal balusters to the structure is carried out with screws or by welding. The latter method is characterized by a high degree of fastening rigidity and is recommended for use with a metal thickness of 0.1 cm. To install metal balusters, special devices are used - clamps. They are designed to be fastened to the side or directly into the stair tread.
Retainers vary in design, shape and size.
After marking the stairs and determining the location of the pillars and balusters, and their number, proceed to the installation process.
For fasteners used:
- self-tapping screws (for wooden steps);
- dowels (for stone, concrete or brick steps).
Each post is mounted at an angle of 90 ° to the surface of the step and is rigidly fixed with a holder. Usually, fixation is carried out from 4 sides.
In addition to the standard one, the side mounting of balusters can be used.
Features of end fasteners
The option when the racks are attached directly to the steps is considered traditional. An alternative option is end fasteners. This installation method can be applied to railings made of various materials. For wood, clamps are not required, since fastening is carried out with self-tapping screws or a zip bolt.
The end fasteners for installing balusters can also be applied to steps, but not to all types of stairs.
Wooden balusters: all mounting methods
Wood is one of the most versatile materials for making balusters, which has the following properties:
- goes well with a lot of styles;
- has a long service life;
- versatile;
- makes it possible to select style and color;
- looks very attractive.
Since wood is soft, it is recommended to use combined installation methods when installing support structures, use glue for additional rigidity.
The installation of wooden balusters is carried out in two main ways:
- To kosour (not used very often).
- Directly to the steps themselves.
Dowel application: if there is no access to the bottom of the step
This installation option can be recommended if there is no possibility of organizing a through-type fastener. The installation of balusters can be carried out on dowels of a suitable size (preferably the largest possible).
Work process:
- Making a hole of the required diameter and depth in the step.
- Drilling a similar hole in the body of the baluster.
- Applying glue (epoxy) to both holes.
- Installing the dowel in the hole of the step.
- Putting the baluster on the dowel until it stops.
Advice:
- the diameter of the drill should be taken a couple of millimeters less than the future diameter of the dowel;
- the type of wood for the dowel must correspond to the handrails and steps so that the same reaction to humidity and temperature changes is maintained.
Through bolt fastening: if the underside of the steps is accessible
This method has a limitation on the width of the steps. It should be more than 4 cm. To fasten the balusters to the steps, through holes are made according to the marking, which will be sufficient for the bolt to enter. The bolt size is determined by the cross-section of the baluster (usually 8-14 mm).
A larger hole must be provided under the bolt head, which will allow the head to be sunk in and hide it with a decorative overlay.
Baluster installation principle:
- Making a through hole in the step.
- Making a hole (2 mm smaller bolt diameter) in the baluster.
- The bolt is screwed in from the bottom up (through the step and the baluster). Right angle alignment.
- Final key tightening.
- Installing a bezel blank.
If the fastening is loosened during operation, it is possible to tighten the bolt.
Zipbolt: reliable fastening
This device consists of a gear head and a threaded stud. Available in two types:
- With two movably connected studs (used to connect the railings with balusters and support posts).
- With one stud (used for closed connections of two perpendicular elements).
Installation is carried out by arranging holes in the step and the baluster of a suitable length. It is necessary to organize a special hole under the head, allowing to insert the head-reducer. Pulling is done with a key - turning it all the way.
Using self-tapping screws: the best way not to use
This way of organizing stairs with balusters is considered the simplest. It belongs to the unprofessional and unaesthetic, therefore it is rarely used. To fasten the balusters, the screws are screwed in at an angle of 40 °. The disadvantage of this method is the weakness of the fastening and not aesthetics.
The hats are subsequently masked with wood-colored putty or caps.
"Dovetail": carpentry way
This option can be used when stocking balusters in length or making them to order. For installation from the end part of the steps, trapezoidal holes are cut. And the same cutouts are organized on the supports. The resulting end cuts are coated with glue or epoxy. After that, they are combined and fixed.
To improve the visual effect on the outside, decorative overlays are used.
Application of kosour
Fastening the balusters to the ladder string can be used in various ways: self-tapping screws, zip bolts, and so on. With this arrangement, the rack should be made at an angle, allowing the balusters and posts to be vertical. Additional strength is achieved by using glue in the fastening points.
Installation of all structural elements should be carried out in accordance with technological rules and taking into account the requirements of GOST. How to attach balusters to steps and railings is selected individually.
The approach to solving the issue depends on the material, freedom of access to the lower side of the staircase and some other factors. In order for the staircase to serve for a long time, preference should be given to high-quality materials.