Making borders for flower beds with your own hands
Decorative borders play a huge role in creating the overall color of the suburban area. They are so different: close to the general landscape or attracting attention to themselves, stationary or mobile, high or low…. Don't know how to make a border for a flower bed with your own hands? Original ideas and colorful photos of flower bed borders will help you make a choice, and a guide on how to make them will save you from annoying mistakes!
Mosaic borders for flower beds
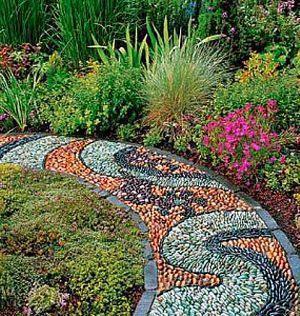 Mosaic is one of the oldest facing materials, universally recognized for its aesthetic appearance and good performance. It is not afraid of moisture, withstands sudden temperature changes, is easily cleaned of dirt and is ideal for arranging a decorative border for a flower bed. A border decorated with mosaics is suitable for edging a high or low flower garden and will become an exceptionally colorful accent on a summer cottage. And making it is not at all difficult:
- Step 1. Preparation of the material.
For the device of the mosaic border, you can use shards of glass, ceramic tiles or porcelain dishes, broken natural stone, shells or beads. A combination of several materials is possible - there are no restrictions, the main thing is that all elements are harmoniously combined with each other. Before laying, the material is sorted:- Sorting by size and color is sufficient for displaying in a chaotic order.
- If a complex composition is conceived, it is recommended to pre-spread the ornament dry - in the future, the cement-sand mortar will not allow making adjustments to the sketch.
- Step 2. Preparation of the base.
The mosaic is laid out on a previously prepared base. In a shallow trench (15-20 cm), dug along a contour outlined on the ground, the underlying layer (gravel, crushed stone and sand in equal proportions) is successively poured. The drainage pad is crowned with a cement-sand mortar (1 part of cement for 3 parts of sand). After application, the solution is leveled and compacted.
- Step 3. Outline the boundaries of the composition.
When the cement-sand mixture dries up a little, you can proceed to drawing the borders of the picture. Apply it "by eye" or according to a previously prepared stencil, by any means at hand: a knife, a nail, or a wooden plank.
- Step 4. Layout of the pattern.
The pattern is laid out with a rubber hammer or garden trowel. The mosaic elements are buried by a third into the cement-sand mixture and tapped, the seams are carefully filled with cement mortar, the excess mixture is removed. The finished canvas is covered with a polyethylene or tarpaulin cloth until dry.
- Step 5. Finishing.
After four to five days, the mosaic surface is sanded with a special hand-operated sander - the surface treated in this way will be absolutely smooth and shiny. If a smooth surface is not needed, for the finishing, it is enough to simply treat the surface with protective coarse-grained abrasives.
Country fantasies: borders for flower beds made of wood
The installation of a wooden border is carried out in three steps:
- Site preparation.
Marking is applied to the surface of the earth - the outline of the future flower garden. A groove is dug out along the applied contour, corresponding to the size of the pegs in width. - Installation of pegs.
Wooden pegs are alternately buried into the prepared trench by at least one third and buried in earth. The earth is thoroughly rammed. The height of the pegs is leveled with a mallet. - Finishing.
All kinds of materials are used for finishing wooden borders: varnishes, paints, varnishes, mastics, putties and pastes. You can also try various applied art technologies: artistic carving, burning, etc. Those who want to emphasize the natural beauty of the wood texture should prefer a transparent finish: apply a glaze acrylic coating, varnish or glaze. An opaque finish will help to hide wood defects: puttying, priming and painting.
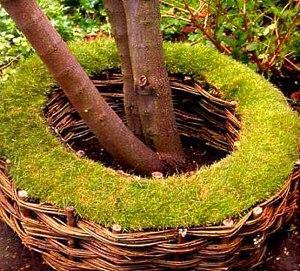 A little harder wicker fence device... It is performed as follows:
- Preparatory stage
Willow twigs (young, flexible) are sorted by length and barked off (removing the bark prevents their germination). On the site, the boundaries of the future flower garden are outlined. - Weaving
You can weave willow branches in different ways:
- Method number 1. Weaving on beacons.
Along the perimeter of the flower bed, maintaining an approximately equal distance, so-called "beacons" are installed - vertical pegs, the skeleton of the future wicker border. The distance between the extreme beacons should be equal to the length of the willow twigs. When the frame is ready, they move on to horizontal weaving: willow twigs are alternately passed between the beacons from one side or the other. The ends are tacked with small carnations. The finished border is covered with a protective solution. - Method number 2. Arched weaving.
The willow branch is bent in an arc, its ends are deepened into the ground at a distance of 5-15 cm from each other. When the "arches" are installed along the entire perimeter, go to horizontal weaving. Weaving is done as described in method # 1.
High and low stone curbs
 Curbs of pebbles, "wild" stone, red or white bricks look spectacular on summer cottages. They are low and raised. And the complexity of their implementation depends on the height!
- Low stone border for flower beds.
Low curbs are laid without a foundation. The order of work is the same as with wooden blocks: the stones are sorted and placed in a dug groove. Lay them flat, flush with the surface, end or edge. Laying is done in one or two rows. - High curbs.
Perform strictly according to the foundation. For the foundation:- A trench is dug (the width of the trench is twice the width of the brick, the depth is 12-15 cm)
- Formwork is being installed (can be knocked together from OSB or any other material)
- The solution is poured (1 part of cement: 2 parts of sand: 3 parts of crushed stone).
After the foundation dries out, they proceed to the masonry. Laying is carried out from the first corner around the perimeter: first to dry, then to mortar, evenly or with a slight slope into the flower bed. The first row is laid just below ground level, the subsequent rows are bandaged in the classical way. The solution is applied to the stone of the previous row and the end. The gaps are filled with mortar. Finishing the seams is done with a thin paint brush.
Unusual stone and mesh curb
It will be very interesting to look at the site on a small curbstone for flower beds, covered between two rows of metal mesh.The composition is performed in a matter of minutes: it is enough just to give the mesh the desired shape, bury it in the ground and generously fill it with previously prepared material.
Mobile structures
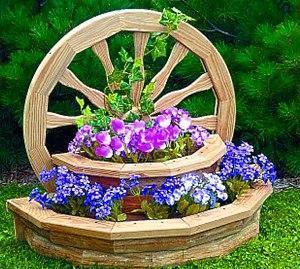
For lovers of variety, as well as those who prefer to grow annual flowers at their summer cottage, lightweight, mobile structures that are easy to transfer from place to place or remove from the site as unnecessary are ideal. This could be the plastic border for a flower bed, which can now be bought at almost any hardware store, or even a border made of old things gathering dust in the darkest corners. Everything will be used: an umbrella, a pan with holes, worn out shoes and car tires along with a car. It is enough just to show a little imagination and the result will surpass all expectations!
Very interesting ideas. Thanks to the author for the wonderful material. I liked the mosaic idea the most, it looks very original. And, at first glance, there is nothing particularly complicated in its design. I want to try, but I don't know if it will work. First, I'll start preparing the material. Yes, I also liked the border made of double mesh and stones. This method, in my opinion, is easier.