The highlight of the interior is the interior arch
 Interior arches are a popular element of modern interior design. The arch is appropriate both in a small apartment and in large apartments. A modest dwelling, decorated with an arch, will become more spacious and lighter, and a large one will acquire the majestic features of the royal chambers. Read also:DIY laminate flooring - step by step instructions
Why is the arch shaped like an arch
The fact is that rectangular structures hanging over the head create strong psychological discomfort. We are much more pleased to see the towering vaults above us, which resemble the leaning crowns of trees in a park or sea waves. In nature, there are no rectangles, all lines are natural, vividly and streamlined. Therefore, since ancient times, architects have tried to repeat natural lines so that a person in any building feels calm and secure.
Types of arches
 There are arches of various types. The classic arch is distinguished separately. It does not change its shape for centuries. The classic arch has a radius equal to half the width of the opening and characteristic decorative elements. The perimeter of the opening has a platband made of stucco or similar materials. In the center of the vault, the arch forms a kind of decorative element - the keystone. The side parts of such an arch are often made in the form of columns, on which the base and capitals are clearly visible. A classic arch is always appropriate in appropriate interiors.
In styles that are not related to the classics, the following types of arches are most popular:
- Gothic - formed by two arcs that intersect at an acute angle and look like an arrow.
- Moroccan - strongly elongated in the center. This type of arches is common in Spanish and Moorish architecture.
- Oriental or Arabic style arches are characterized by an opening in the shape of an onion or the keel of an inverted boat. This type finds its application in the architecture of India and the Muslim countries of the Middle East. Echoes of the style can be seen in ancient Russian cult buildings.
- Modern is distinguished by its unusual forms, among which asymmetry is popular.
The modern democratic style allows for the most unexpected forms and design findings. Asymmetry is widely used, mixing styles and materials for decoration.
New construction and finishing materials - drywall, which are attached to a frame made of wood or metal profile, allow to bring to life any design idea. These materials do not require the involvement of specialists with professional tools.
All work on the device of the drywall arch is easy to do yourself.
Arch as a way of zoning
 Creating an interior arch is a convenient and practical way of zoning a space. With its help, you can both select separate zones in one room or studio apartment, and combine small rooms into one.
Most often, arches are arranged in hallways, removing the door, which darkens the room. A small hallway in this case visually merges with the next room, especially if the same finishing materials were used for them. For example, the same tiles are laid on the floor in the hallway and in the kitchen, and the room is separated by laminate or parquet.If in an apartment or house a separate room is allocated for the dining room, the interior arch between it and the kitchen will be much more appropriate, since the hostess will often have to walk between them with dishes in hand.
When combining a balcony or loggia with a room, arrange the doorway in the form of an arch.
According to the building rules, it is forbidden to demolish the load-bearing outer wall, and the arrangement of the arch will allow not to break the rules and give a zest to the interior. Below we will describe how to make an arch in a doorway.
If the arch will stand in a room with high humidity, you should purchase the appropriate drywall - its sheets are green. Ordinary material in high humidity conditions will lose its shape after a few years.
We build an arch with our own hands
It is easy to create such an arch in any room - in the kitchen, hallway or living room. If you have very little experience in finishing work, we suggest you make an arch with your own hands using step-by-step instructions and a photo.
Prepare your tools in advance:
- screwdriver;
- scissors for metal work;
- knife;
- roulette;
- putty knife;
- grater or grout;
- carpentry square;
- pencil.
Materials:
- drywall or wooden blocks
- metallic profile;
- plywood sheet;
- self-tapping screws for drywall;
- putty and plaster;
- paper tape.
Also, do not forget about personal protective equipment - gloves, glasses and a respirator.
When everything is ready for work and a place for the future arch is chosen, the doorway should be measured. Given the size of the opening, draw the desired arch shape on a drywall sheet. This stage is the most responsible, so you should take it seriously. The curve of the required radius can be drawn by screwing a self-tapping screw into the drywall with a rope attached to it. The length of the rope should be equal to the length of the radius. When the contours of the arch are drawn on a sheet of drywall, do not forget the old rule:
Seven times measure cut once.
Cut the future arch along the contours using a jigsaw or a special drywall hacksaw. Secure the sheet carefully before cutting so that it does not move. After the drywall has been cut, it can be set aside. It's time to make the wireframe. As we remember, it is made from a metal profile or a wooden bar. A frame made of a profile is more suitable for brick walls, and bars for wooden ones.
Installation of a metal frame
In order to make a drywall arch, first mount its frame. Guides of the required length are cut from the profile and fixed on the wall as shown in the photo.
If the profile is attached to a concrete wall, it must be drilled drill holes and hammer in the dowels, into which the screws are then screwed. Self-tapping screws with a length of at least 4–5 cm are used to fasten the profile to a wooden wall. The optimal distance between them is 10–12 cm.
After fixing the guides, measure the profile section for the lower edge of the arch. Since the arch has a curved shape, the section of the profile will also have to be bent. To do this, its sides are cut with scissors for metal and carefully bent, each time trying on a drywall arch to the cut out detail. This process looks like this:
Next, the bent part is attached to the guides either directly or using straight hangers, as in the drawing below.
Suspensions are needed to rigidly attach the bottom of the arch. Next, the side parts of the arch, cut from drywall, are screwed to the frame. The most convenient way to do this is with a screwdriver.
Then, at several points, jumpers should be installed, connecting both side walls of the arch.
Installation of a wooden frame
If you decide to make an interior arch of wood, then you first need to determine the thickness of the wooden bars. Measure the width of the opening and subtract the thickness of the plywood and drywall from it, the resulting figure will be the thickness of the bar. Use a jigsaw to cut the sides of the arch out of the plywood.
Secure the entire structure with self-tapping screws.It should look something like this.
Installation of the lower part of the arch
After installing the side parts of the arch, it was the turn to sew up the opening from below. Using a tape measure, measure the length and width of the bottom, and trace it onto the drywall. Since the lower part is curved, the material will have to be bent. To do this, draw parallel lines across the strip with a pencil. The distance between them should be about 10 cm.
Cut the paper along the lines with a knife. Attach the drywall to the bottom of the arch with notches up and gradually shape it into the desired shape with smooth, slow movements.
When bending drywall, do not use too much force so that the material does not break.
Next, align the edges and fix the lower part with self-tapping screws.
After fixing the lower part, clean out any irregularities on the drywall with a knife.
Arch finishing
So that the joints and fastening points of the screws do not shine through, they are pasted over with paper tape or masking tape. Smooth with a putty in several layers and grind each layer with an abrasive of the desired grain size. For puttying, use acrylic putty for interior work or special for drywall. Putty is applied with a spatula and leveled with grout.
If in the process of breaking the doorway large pieces have broken off from the concrete wall, plaster is used. Unlike putty, it can be applied in a thick layer. After the plaster has dried, the surface is leveled with a thin layer of putty.
To prevent cracking, an assembly mesh is reinforced over the putty.
In the last turn, a finishing layer of putty is applied, covering the mesh. After drying, the surface should be thoroughly cleaned. If the mesh is still visible after drying, another layer of material is applied. The result should be a perfectly flat white surface.
Now the do-it-yourself interior arch made of drywall is ready for decorative finishing.
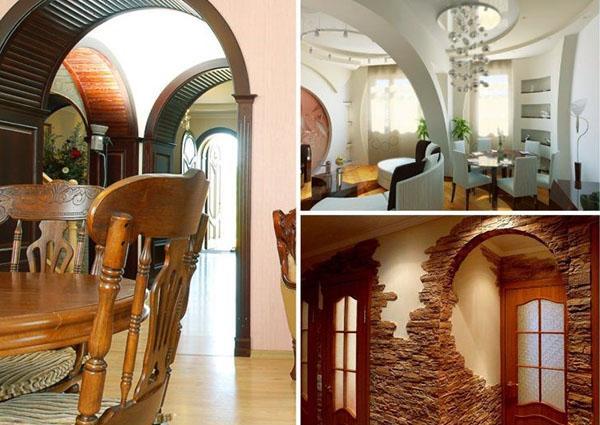
Examples of using arches in design
Check out the most successful and beautiful examples of drywall arch in interior design.
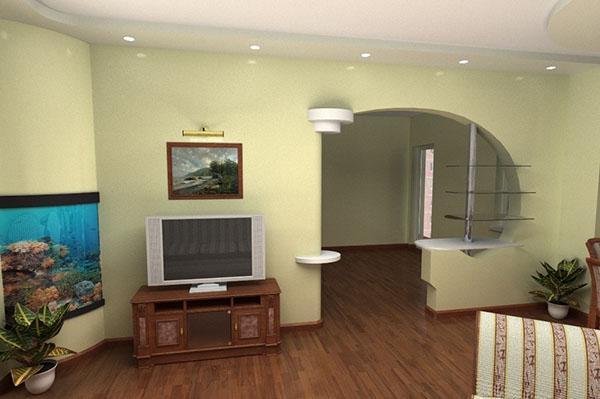
An intricately shaped arch with shelves unites the room with a balcony.
Lights are mounted in this arch between the room and the hallway. The result is a spacious and bright room.
In the next photo, an arch leads to the kitchen instead of a door.
In the hallway, all doors are replaced by arches.
The photo clearly shows how the creation of an interior arch ennobles the room and emphasizes the beauty of the interior.