DIY furniture remodel is an effective method to update your home interior
How nice it is to enter a house or apartment after a major overhaul, where even the walls have found new life. However, old cabinets, tables and chairs can ruin the interior of a living space, so reworking furniture with your own hands is the solution to this problem. Of course, business must be approached with discretion. Even old shabby headsets can be easily transformed into stylish interior items by simple manipulations. They are still quite sturdy, although they take on a stylish look.
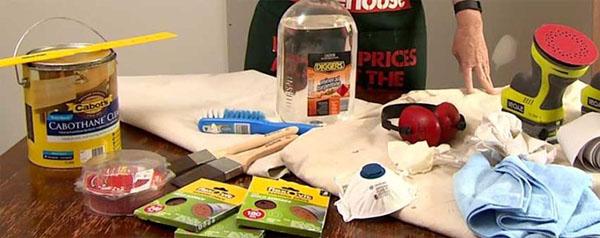
DIY furniture remodel: preparing tools
Often, old household items lose their former attractiveness. The front part of wooden objects will fade in the sun. Armrests are wiped on sofas or armchairs. The surfaces of chairs and tables are scratched. However, you should not get rid of these things just because they have lost their former beauty. To renovate old furniture with your own hands, it is important to follow a series of procedures.
Let's mark only the most popular ones:
- decoration;
- surface painting;
- use of film;
- decoupage;
- artificial aging;
- banner of upholstered furniture.
Each process will require a set of tools, which it is advisable to prepare in advance.
For example, for painting you will need:
- putty;
- primer;
- paint;
- varnish;
- sandpaper;
- Scotch;
- rubber spatula;
- paint tray;
- roller;
- several brushes;
- respirator;
- protective glasses;
- special clothing;
- clean rags.
While the list is pretty impressive, preparing it will save you unnecessary stress and time. To give a second life to old furniture, you can cover it with a film. For the procedure, you will need a degreasing agent, a suitable film and clean cotton rags.
You can drag chairs or a sofa with the following set of tools:
- new fabric;
- staples of a suitable size;
- scissors;
- yardstick;
- pencil;
- stapler.
For decoupage, you need a suitable glue, stickers or stencils with various images.
Before starting the restoration of any piece of furniture, you need to check it. Is it really strong. Are there any rotten areas or damaged spots on it?
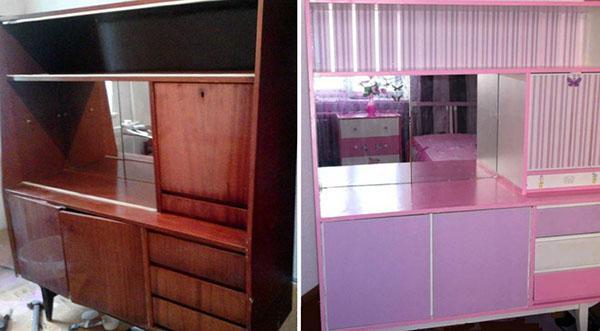
An old wardrobe in a new "role"

The process of reworking furniture with your own hands requires from the master a creative approach, measured action and knowledge of his craft. If such a thought has already arisen in my head, you can safely implement it into reality. There is no need to be afraid to "spoil" old burnt-out furniture. Many have managed to give it a stylish and presentable look.
Consider how to remodel old cabinets with your own hands, the photo of which is shown above. There are many options for turning furniture into a work of art.
To do this, use:
- photo wallpaper or photo printing;
- stained glass film;
- vinyl stickers;
- glass surface matting;
- decorative plaster;
- painting.
To update the old wardrobe, use wide-format wallpaper, which is made on a special printer.
There is a wide range of such products:
- natural landscapes;
- all kinds of flowers;
- animal world;
- night cities;
- fairy-tale heroes;
- abstract patterns.
Modern technologies even make it possible to apply a pattern to a wooden or glass surface. However, not everyone can afford such a service.
When gluing a photo print on a cabinet, it is advisable to use glue that contains starch.
The original idea to remodel the cabinet with your own hands is the use of decorative plaster. With its help, volumetric patterns are obtained that can be painted in any color.
The update procedure will require:
- a stencil made of cardboard, vinyl or plastic;
- flat spatula;
- masking tape;
- acrylic paint;
- sandpaper;
- varnish;
- decorative plaster;
- putty.
If the cabinet is covered with paint, remove it with sandpaper. Rub until a wooden base appears. Then the surface is carefully examined and, if necessary, all kinds of cracks are sealed with putty. A stencil is attached to the cleaned surface and decorative plaster is applied with a flat spatula. Without waiting until it hardens, carefully remove the curly base. Irregularities are corrected with a knife.
When the plaster is completely dry, the cabinet is covered with acrylic paint in several layers. At the very end, they are varnished to make the product look luxurious.
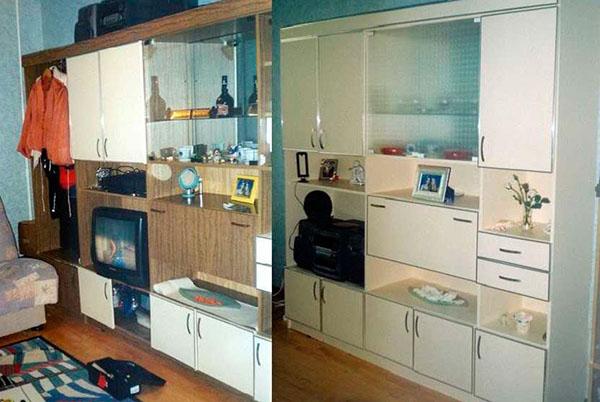
A modern look at the Soviet wall
Say what you don’t say, but furniture from the last century is famous for its special durability to this day. However, her appearance has long gone out of fashion. In addition, it has lost its chic and shine, turning into an ancient exhibit from the past. But even in this state, the owners are in no hurry to part with her, because she can be given a new life.
There are many ways to remodel an old wall with your own hands, giving it a modern look and luxurious appeal. The most popular option is to change the color of the front of the furniture.
To achieve the goal, use:
- special film;
- wallpaper;
- paint.
Modern manufacturers offer a wide selection of self-adhesive films for every taste. They are monotonous, colored, of various textures and shades. Most often, craftsmen use a film that resembles natural wood.
The process of restoring Soviet furniture involves a number of simple steps:
- disassembly of all wall elements;
- cleaning the surface from dirt with a detergent;
- degreasing by treating the panels with a solution of warm water and vinegar;
- drying all cabinets;
- making fragments of a suitable size from the film.
Before gluing the material, the surface is sprayed with water from a spray bottle. This makes it much easier to spread the film on the facade to avoid bending or air capsules.
Next, a film is laid on the finished surface and actively smoothed with a soft cloth. Movements begin from the middle of the site towards the nearby edges. The work is done slowly to achieve perfect coverage. If air bubbles form, the film is pierced with a needle. After that, the material is covered with a clean cloth and ironed with an iron heated to medium temperature. At the end of the procedure, the edging is glued, the furniture is assembled and the necessary fittings are installed. Kitchen sets of old models are restored in a similar way.
Glass surfaces are pasted over from the inside using the same technology.
Old furniture in a new way
Since people have not yet invented a perpetual motion machine, we are all perishable, like the things that fill our homes.
However, with the help of modern paints and putty, you can return the former beauty to such wood products:
- cabinets;
- tables;
- chairs;
- stools;
- dressers.
Redecorating old furniture is pretty easy with water-based paint. After drying, it does not emit harmful vapors, it is particularly resistant and does not fade.
Acrylic or thixotropic paint is most often used. The substance does not leave streaks on the surface.
Renovation of bedside tables
In order to competently remodel cabinet furniture and give it a modern look, simple processes are performed:
- remove doors and drawers;
- unscrew the fittings;
- tape over mirrors and other glass surfaces;
- all elements are thoroughly washed with soapy water and dried;
- cover the furniture with a primer;
- chips and cracks are sealed with putty;
- again treated with a primer and sandpaper.
The prepared surface is coated with paint using a roller or brush. To get an excellent color, several layers are made. After complete drying, it is treated with varnish. It can be matte or glossy. At the end of the work, the adhesive tape is removed from the glass surfaces, and the parts are assembled. As you can see, reworking furniture with your own hands is an easy process that is accessible even to inexperienced heads of families.
Second life to grandma's dresser
Practice shows that antique furniture stored in the attic loses only the outer coating. Often, it does not even dry out, remaining a reliable thing for the home.
Careful alteration of a legacy chest of drawers requires a lot of effort. It consists of several steps:
- remove all accessories;
- remove the old coating with sandpaper or mechanically;
- damage is repaired with putty;
- grind uneven areas with sandpaper;
- attach polyurethane moldings with self-tapping screws or PVA glue;
- treat the product with a primer made from glue and water (1: 2);
- paint in several layers;
- after drying, the decor is carried out with silky wallpaper;
- fasten fittings and legs.
As a result, the grandmother's chest of drawers takes on a new life, and if she saw it, she would probably be pleasantly surprised.
Restoration of an old table
Since no human can stop the process of destruction, it remains to find a reliable way to slow it down. If the house has an old, but solid table, it can be given another chance. For work you will need:
- Grinder;
- sandpaper;
- roller;
- several brushes;
- putty;
- primer;
- paint;
- varnish;
- glue.
Alteration of the old table begins with surface preparation. Any roughness, cracks and bumps are removed with a knife and sandpaper. Remove dust and degrease the surface using acetone or alcohol. Next, the table is covered with paint or varnish. There are other ways to restore the table: gluing films, decoupage, ceramic tiles. In any case, it will serve the owners for more than one decade.
Having examined in detail the methods of reworking old furniture with your own hands, you can see that this is not at all difficult. The main thing is to be patient, apply the advice of experts and the desire to create. Plus, have the right tools on hand. And then antique furniture in modern processing will appear in the interior.