DIY paving slabs
 To beautify a summer cottage, not only plantations and decorative elements are needed, but also the arrangement of paths. The construction market offers many options for coatings, among which paving slabs are leading.
Types of paving slabs
Modern technologies allow you to choose paving slabs for giving a wide variety of shapes, sizes and colors. Many consumers have already appreciated its advantages:
- attractiveness;
- long service life;
- high quality;
- resistance to sunlight and external influences.
Factory tiles are made in two ways:
- vibration casting - the resulting product is suitable for the formation of small areas and garden paths, where there will be no revitalization of the movement of people;
- vibrocompression - the resulting tile is more intended for parking a car or laying the road, that is, for places subject to heavy loads.
In addition, you can make paving slabs for a summer residence with your own hands. Here it is worth deciding on several options that depend more on the design of the suburban area:
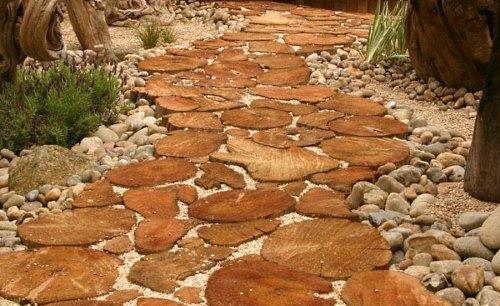
- from wooden planks or logs;
- from concrete slabs;
- filled with concrete;
- concrete stone;
- natural stone;
- plastic and rubber plates.
What to make paving slabs from?
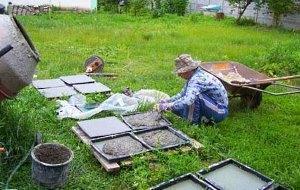 Ready-made tiles for garden paths are not cheap. Therefore, if there is a limitation in funds, then it can be made by hand. Self-production of paving slabs will make it exclusive and durable. And during the work, the master will receive a sea of positive and pleasure. This simple, but long-term process will be completely mastered even by those who do not have skills in construction.
For manufacturing you will need:
- cement grade not lower than M400, river clean sand and water;
- wooden blocks and base for making molds or finished plastic molds;
- reinforcing mesh or steel rods;
- any lubricants for the form;
- small concrete mixer;
- for colored tiles - coloring pigment;
- to create a pattern - a rubber mat with a pattern.
To prepare the solution, you need to prepare cement (M400), sand and water in a ratio of 1: 3: 0.5. If cement of the M500 brand is used in the production of tiles, then it must be taken in a ratio of 1: 4: 0.5.
Sand is first immersed in the concrete mixer, then, without stopping the rotation - cement, water is gradually added. The kneading time is 10 minutes.
The output should not be too liquid solution, but viscous and not tiny. Pour the resulting mixture while rotating the drum, carefully tilting it. If you plan to make colored tiles, pigment must be added to the mixture half a minute before the cement is supplied.
Self-production of paving slabs
The mold for the manufacture of tiles from wooden blocks and a flat base can be made of different configurations and any dimensions. The main thing to consider is one rule: its dimensions should not exceed 30x50 cm, otherwise there is a possibility of cracking. It is best to fasten the sides together with screws. This will make it easier to release the tile, as it will be enough just to unscrew the screws and disassemble the mold.

Prepared or finished plastic molds, as well as a rubber mat, must be lubricated with a thin layer of grease. Put a stencil mat on the base of the mold and pour the prepared mixture into them to a height of 3 cm.Then you need to put the reinforcement and pour another layer of concrete mortar (3 cm). Next, the forms should be processed on a vibrating table. This process will strengthen the product and improve its performance. At the end of the vibration treatment, the molds must be covered with polyethylene and left for 2 days.
When the concrete mixture hardens, the split mold can be disassembled, and the tile can be gently shaken out of the plastic molds. DIY paving slabs can be laid on garden paths in 10-12 days.
Production of paving slabs "pine cut" (video):
River stone paving slabs
If the cottage is located near the river, then ordinary stones can be used as a decoration for paving slabs. Small stones of an interesting shape are suitable for the product. To ebb the tiles, you need to make a wooden formwork. After the concrete with reinforcing rods takes shape, it is necessary to lay the top layer by stone. And then with a trowel, press the stones into the solution with force. After the concrete has dried, the decorative tiles can be removed from the formwork.
How to properly lay paving slabs?
Before laying out the tiles on the future track, you must first prepare the base. This process consists of the following steps:
- Markup. The site is cleared of snags, stumps, debris and leveled with tools or construction equipment.
- Embankment preparation. First, the top layer of soil is removed along the width of the track, then beacons are installed - pegs driven into the ground, along which the thread is pulled. This is a kind of border of the country path.
- Laying bulk materials. Crushed stone is poured into the prepared area and leveled with a rake throughout the site so that a flat surface is obtained, without bumps and pits. To increase the strength and density of the base, the laid crushed stone is compacted. A layer of sifted river sand is poured on top, which is also leveled and compacted.
- Installation of curbs. A shallow trench is prepared along the path from one or both sides, into which sand is poured to a height of 5 cm. Its depth is calculated from the fact that 60% of the curb will be under paving.
After completing the rough layer of sand and cement in a ratio of 1: 5, a sand mixture is prepared. It is poured onto the base of the track to a height of about 2 cm. Now the process of mounting the track begins.
It is better to choose the direction of movement from the house to the gate. Each tile should be laid very tightly in relation to each other, and at turns leave a gap of about 0.8 cm. During laying, each tile must be tamped with a mallet and periodically checked the evenness of laying with a level. After completing the work, for the strength of the connection, sprinkle the entire path with sand, cover the territory, and after a few days pour water on it.
Very original. I really liked the option with smooth stones. This summer I will definitely try to make such a beautiful tile. Moreover, I need to make a path from the house to the gazebo. It will perfectly fit into the interior of my summer cottage. Apparently, it will not be difficult to make it, the main thing is to make the right shape and collect the right amount of smooth stones. Thank you for the article. I hope I succeed.
Thanks for the informative article!
Good article! Thank! We also want to make our own tiles, we have already made a vibro table ourselves. Watch the video, maybe you can make a similar one too! -https: //youtu.be/IqQw2jMhLJE
The term "Modern" itself goes back to the 19th-20th centuries, at this time a fundamentally new type of art emerged in Europe, linking various components of different trends of this period.
One of the fundamental features of the Art Nouveau style is undoubtedly smooth curves and lines, deviations, if possible, from right angles and preferences for more natural patterns, those that are characteristic of natural objects.
This movement, as a rule, tries to harmoniously combine artistic and utilitarian principles in everything that one has to work with. The vast majority of interior elements produced in this style are flexible and sophisticated.