How to install a kitchen hood

For forced removal of combustion products, odors during cooking, air purification, you need to install a kitchen hood. Technology installation depends on the selected model, duct and kitchen parameters. But first you need to study the rules and regulations of work.
Regulatory documents and rules for installing a kitchen hood
The main provisions on ventilation and heating are described in SNiP 41-01-2003. For kitchens, you can choose a filtration model or with outlet to ventilation (for street). In the first case, the air forcibly, due to the pressure difference, passes through the filter elements and returns to the kitchen. In the second, it is removed from the room through the duct. To install the first type of cooker hood, do not you need to arrange an air channel. But these models have little productivity.
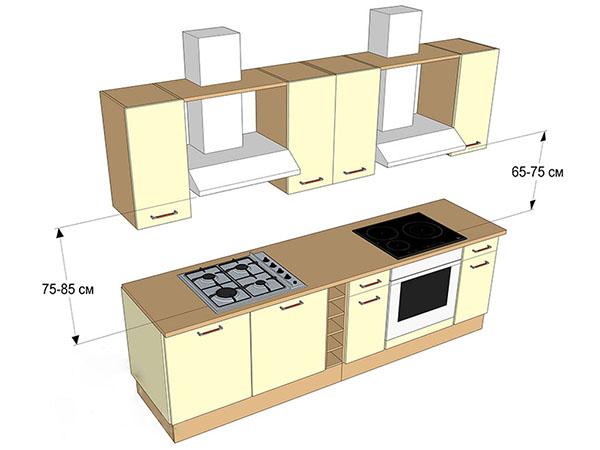
Distance from the hood to the hob
For a channel device, you must follow these rules:
- The distance from the hob is up to 90 cm.
- The dimensions of the mounted model should be 5-7 cm larger than the dimensions of the plate.
- When connecting to a ventilation shaft, minimize the turns of the air duct. This improves the bandwidth of the channel.
- Simultaneous use of a cooker hood and a gas heating boiler with an open burner is not allowed.
A detailed description of how to hang a hood of a particular model is in the instructions from the manufacturer. Installation prices - 1400-2500 rubles. Additionally you can order assembly, dismantling of the old device.
The diameter of the duct must not exceed the size of the ventilation shaft. Otherwise, due to the pressure difference, the air flow will enter the kitchen from the general ventilation.
Kitchen hood installation, preparatory stage

A prerequisite is to mount the hood above the gas stove or electric hob. Air flow from room to the ventilation duct must capture combustion products, steam. Hanging cabinets on the wall should not interfere with the installation. If this condition is not met, they need outweigh. The hood body does not come into contact with furniture. Exception - this is allowed manufacturer.
Preparatory work, before installing the hood if the gas pipe interferes. A costly option is to coordinate the relocation of the pipeline with a service provider. The second way is to make a stand.
Stages of work:
- Measure the distance from the wall to the outer edge of the pipe.
- Make a wooden delivery. Its thickness is the measured distance + 3-5 cm.
- Attach the support to the wall at the height of the hood fasteners.
After this work, the installation scheme of the hood changes - the dimensions are relative the plates are displaced towards the room. It is important that the hood covered the entire area of the hob.
If it is not possible to connect to the general ventilation of the house, you need to do hole in the outer wall. Its diameter should be 3-4 more than the duct cm. A "sleeve" is installed in the finished hole, the places of its contact with the wall is sealed.
It is possible to exclude the appearance of reverse draft when air from the ventilation duct enters the kitchen using a check valve. It will automatically close if the flow direction changes.
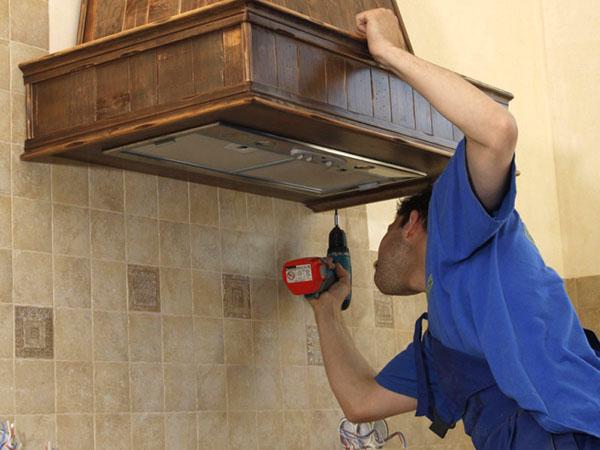
Wall-mounted hood installation
Before installing the hood in the kitchen, you need to measure its overall dimensions.Wall-mounted models are attached to the wall in a pattern similar to hinged canopies. The number of fixation points is from two to four. To complete the work you need electric drill, tape measure, ruler, building level. Sometimes there is a paper template for the hole pattern. Standard hood mounts are used. An exception is the use of brackets if the gas pipe interferes.
Installation steps:
- Unpacking the model, checking the equipment and the operation of the electric motor.
- Marking and drilling holes on the wall.
- Installing the case, fixing it with screws.
- Fastening the air duct.
- Air duct sealing.
- Power supply connection.
One of the problems in the operation of the exhaust device is the appearance of noise. it vibration of the housing. To reduce it, you can use plastic or rubber pads. They are installed before installing the flat hood to its back.
The controls (buttons) are on the front. The calculation of the height of the housing attachment is made taking into account free access to them.
Installing the Dome Model
The mounting scheme of these models depends on the type - wall, angular or island. The installation of an island-type dome hood is the most difficult, since fixation takes place on the ceiling. Other models are mounted according to standard scheme. The island model is bought if the stove is not near the wall, but in the central parts of the kitchen.
Mounting procedure:
- Determine the installation location.
- After unpacking, check the contents. Unlike attaching the hood to the wall, the dome is fixed to the ceiling. To do this, use pins with collets or cables.
- Drawing up a duct diagram. It is laid to the common house channel or to the hole in the wall.
- Installation of fasteners on the ceiling.
- Calculation of the distance from the hood to the hob. The minimum installation height of the hood above the gas-type stove is 75 cm. This value is not standardized for induction and electric models.
- Fixing the case to the ceiling.
- Installation of the air duct, checking its tightness.
The decorative casing provides a good appearance, protects against mechanical damage to the ventilation duct. For island models, you need to shorten it, if the ceiling height is non-standard.
The installation of the island hood is done before the installation of the suspended or stretch ceiling.
Built-in hood
To create a unified kitchen interior, prepare a built-in hoods for furniture. The advantage of these models is that they are partially or completely hide in special wall cabinets. But the installation work is more difficult than that of wall options. It is necessary to prepare holes in the furniture, provide access to exhaust device for its inspection, prevention and repair.
Installation features:
- The bottom plane of the cabinet must not be below the inlet openings of the hood.
- I downloaded all the technological holes in the cabinet - for fixing the case, laying the ventilation duct.
- The first stage of installation is to mount the cabinet to the wall.
- Then a hood with a damper is installed. This will reduce the likelihood of reverse thrust.
- Conducting the duct.
To protect furniture from thermal effects in places of contact with body before installing the kitchen hood, you can install homemade rubber gaskets. An alternative is treatment with a heat-resistant sealant. This will reduce noise and vibration during device operation.
Assembly and installation must be done after installing everything kitchen set... But the dimensions of the model and the diagram of its location in the closet are calculated first.
Air duct selection
In addition to choosing a model, you need to draw up a diagram of how to conduct an exhaust hood to ventilation to remove unpleasant odors and combustion products from the stove. Before that, an air duct is selected - a channel for the passage of air masses.Its properties and material depend on the location of the outlet (hole in the wall, common ventilation duct). The condition is the minimum number of turns. This will reduce air resistance, which will have a positive effect on traction.
Types of air ducts:
- Plastic. They can be square or round. Advantages - minimal air resistance, durability. The disadvantage is the complexity of installation.
- Corrugated aluminum. They do not need to use connectors, they stretch and compress. The disadvantage is the likelihood of noise during operation.
Air duct diameter - 125-200 mm. For rooms with a volume of up to 35 m³, models of 150 mm are used.
Air duct connection
The scheme of how to install the corrugation on the hood depends on the duct model. For plastic pipes use a special adapter, for corrugated pipes - a clamp. It is important to ensure the tightness of all connections. Therefore, they are processed sealant. When connected to a common house channel, use a protective grill. It is necessary to protect against the ingress of foreign elements into the system.
Before installing the hood in the duct, you need to check its condition - no debris, the integrity of the channel, the presence of traction. For wall mounting use clamps with brackets. Their inner surface should be rubberized. This will compensate for vibration and reduce noise.
Checking the work is done before installing the decorative peel. The exhaust device must operate in all prescribed modes.
Power supply
The operating instructions should describe how the hood is connected. to the mains. The power of the models does not exceed 0.5 kW, therefore a separate power line is optional. You can connect to the nearest power outlet or power strip in the kitchen. If the hood supplied without plug - it can be connected in two ways.
The first is to buy and attach a plug (sealed) to the wires. The second is the use of terminals. They will connect the networks into a cable with contacts on the switchboard installed in the kitchen. The exhaust outlet must be grounded. If it is located close to the hob, there is a protective cover on it.