DIY mini-drill for small jobs
 A drill for drilling small holes is not always available in stores. If a jewelry drill is not available, you can make one yourself. A homemade hand drill can be used to drill holes in soft metals and tiles. For making miniature hand drill you will need a windscreen washer motor, an on / off button, a round button to start adjusting the speeds, a glue gun, a miniature soldering iron, a mini-drill chuck, which can be ordered from the online store, and a set of miniature nozzles for the chuck. A printed circuit board will need to be fabricated to provide speed control.
Drill making
Remove the engine from the washer housing. This can be done manually. In the washer cover, you need to drill three holes for buttons and a power connector. The buttons and the power connector for the drill are placed compactly and fixed with hot melt glue. In the second half of the washer body, a circular cut is made with a file so that the washer motor with a chuck and a drill fits into the body. When the drill body is ready, you can start making the PCB. The board case must be metal. We will consider the circuit board in the next section.
Board layout
The ATINY13 chip should be in the center of the board. To power the microcircuit, a transistor and a zener capacitor are soldered to it. A wire is soldered to the fifth leg of the microcircuit, which will power the windshield washer motor. Power is connected to the motor through a transistor. To the third leg of the microcircuit, through a resistor, a wire is soldered to the button, which will close the leg to minus. The ground contact is soldered to the minus of the microcircuit.
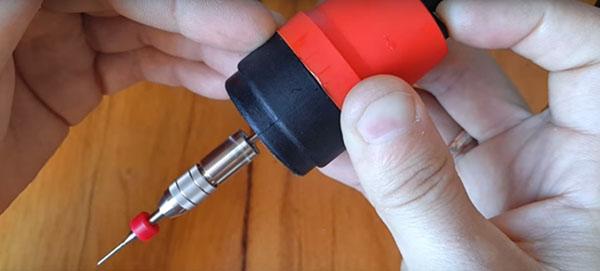
The entire circuit is soldered to the PCB body. The dimensions of the printed circuit board should be 19X14 mm. The printed circuit board is placed in the housing cover. Next, you need to solder the wires into the PCB. From the middle of the microcircuit there will be a "+" wire of the microcircuit power supply. To the edge of the microcircuit, the "-" wire of the microcircuit power supply is soldered. Then a second wire is soldered to the leg of the microcircuit and the motor, from which the paired wire departs. One end of it is soldered to the second leg of the power button, and the other to the "+" power supply of the electric motor. Two more wires are connected to the power connector. One is soldered next to the resistor of the microcircuit, and the second is soldered to the round speed control button. Then the motor is screwed to the body, a cartridge and a drill are put on it. Mini drill assembled.