How to make LED lighting for seedlings with your own hands?
 The most important factor in the life of plants is supplementary lighting, since light serves as a source of energy for them. Thanks to light, plants convert water and carbon dioxide into carbohydrates. As a result of this reaction, their tissues are formed, and metabolic processes take place.
However, for the successful cultivation of strong seedlings, in addition to the amount of light, its spectrum and light period are also important.
By regulating the length of daylight hours, it is possible to successfully manage the entire process of growth and development of seedlings.
Influence of the spectrum of the LED lamp on the development of seedlings
The spectrum of light affects the development of plants in different ways.
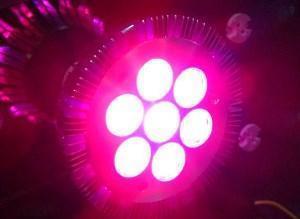
LED light sources for plants produce rays in the red and blue spectra. It is these rays that are most necessary for seedlings, since they contribute to their successful development.
In particular, the blue spectrum activates the growth of the root system, the red one has a beneficial effect on the overall formation of seedlings. Colors such as yellow or green are practically not absorbed by plants.
The wavelengths of light required for the photosynthetic reaction are different from the wavelengths emitted by a conventional incandescent lamp, which is extremely phyto-efficient. Therefore, seeing as it seems, and a lot of light, plants actually lack it.
Video about making LED lighting for seedlings
Benefits of LED seedling lighting
LED plant lights are ideal because:
- By means of diodes, it is possible to obtain light waves of the desired length and brightness. They give an incredibly narrow spectrum, their efficiency reaches almost 99.9% - this is the peculiarity of LED lamps. This means that the seedlings absorb only those light waves that they need at the moment.
- The energy consumption of an LED source is much less (up to 8 times) than conventional lamps. It is also important that there is no need to change burnt out light bulbs.
- Has a low supply voltage, which makes the circuit safe when exposed to water. This allows the source to be located close enough to the seedlings, which, however, does not lead to overdrying or, on the contrary, more frequent watering, since the LEDs for plants practically do not heat up, which cannot be said about the old-style lamps.
- The absence of flicker is another reason in favor of LED lamps (this is how LED lighting is called).
- LED lamps do not emit ultraviolet and infrared radiation. This is an extremely important factor, since some plants are quite sensitive to them, the excess affects their overall development adversely.
- The environmental friendliness of LED lamps attracts - they do not contain mercury, gas, other toxic substances, their disposal does not require special conditions.
- The service life is very long - up to 50,000 hours.
All these advantages of LED seedling lighting are attracting more and more consumers.
The main reason for the insufficient distribution is their high cost.
It has been noticed that the effect of LED lighting for seedlings persists even after they are planted in the ground. From such seedlings, more viable plants develop, which quickly gain color, they begin to bear fruit earlier and a more abundant harvest.
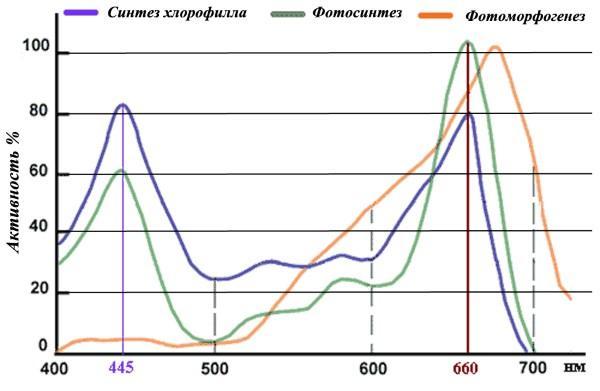
It can be seen from the graph that LEDs with a wavelength of 660 nm have the greatest effect on both chlorophyll synthesis, photosynthesis, and photomorphogenesis (the ability to form fruits). That is, in LED lamps, red light 650-660nm + a little blue should prevail (ratio 3: 1)
DIY LED plant lights
 The simplest and most labor-intensive way to make a backlight from diodes on your own is to use an LED strip.
To complete the work we need:
- a small panel, corresponding in size to the area that needs to be highlighted;
- two LED strips - red and blue;
- power supply for connecting the tape to the network.
Important: For plants, the ratio of diode colors should be 1: 8, that is, one part of blue diodes, 8 parts of red.
LED lamps cannot be directly connected to a 220 volt network. You can only use a special unit capable of transforming the voltage to a value of 12 volts (less often 24) and converting alternating current into direct current.
You can buy a driver that differs from conventional power supplies in that it is equipped with a current stabilizer and is designed for a certain type of LEDs. The driver provides more reliable protection in case of, for example, overvoltage or other disasters.
How to mount LED strip on a panel?
 The technology of mounting the LED strip for seedlings is very simple, it is quite possible to install it on your own.
Before sticking the tape, it is necessary to thoroughly clean the panel on which you will mount it from dirt and degrease.
If necessary, cut the tape into pieces, cut it between the soldering pads. These places are marked on its surface. The pieces of tape are connected by soldering them with wires, or by connecting them with a special connector.
The tape, in contrast to the LED lamp, does not require a fan for cooling, however, in cramped conditions and insufficient ventilation in the room, it should be mounted on an aluminum profile to remove heat, since overheating greatly reduces the life of the diodes.
An adhesive layer is applied to the back of the tape. We remove the protective coating from it and press the tape to the plane of the panel, applying a little effort.
During installation, strong bends of the LED strip should be avoided - you can damage the conductive paths that power the LEDs.
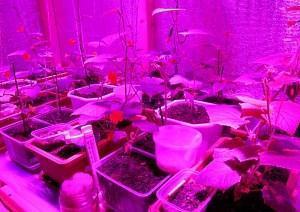
A panel with strip LEDs for plant illumination is installed on the legs and containers with seedlings are placed under it.
We decide on the place of installation of the power source, prepare it for connection to a 220 volt network, connect the LED strip and apply voltage, observing the polarity.
The blue-green-red ratio (25-30) - (20) - (50) according to the data on the phytotron at the Institute of the USSR Academy of Sciences
I will tell you how I did it. I ordered LEDs (25 deep red 650-660nm, 3 red 620-630nm, 8 blue 440-450nm) for LEDs I gave 1300r. + immediately bought power supplies for 3500r. At home, I soldered it all on an aluminum plate. Nothing complicated. The parcel took 8 days, but I live far away in Chita. I am completely satisfied with the lamp. By the way, on their website you can buy ready-made lamps with the possibility of selecting LEDs, but it will come out more expensive. Such as mine will cost from 12-15 thousand rubles. But ready-made, beautiful. Well for me it's better to do it by hand. By the way, if you suddenly have problems with choosing a power supply, they will prompt you. PS: Can anyone see LEDs cheaper? Please share. Now I want to make LED lighting for the aquarium. I had to order right away, if you take more there is a discount. 🙁
Not an intrusive advertisement ...
On Ali express, LED strips are several times cheaper, and the power supply was ordered there, though it took 1.5 months to wait. Everything works perfectly)
Conducted an experiment. Collected phytolamp for seedlings. Since plants in the first phase of growth require more blue spectrum, I accordingly sharpened the phytolamp for this. Now it is easier to buy ready-made, but it will not be specialized for seedlings.