Assembling a kitchen set - the secrets of craftsmanship
When buying kitchen furniture, usually all elements are ordered from one manufacturer and are made in the same style. The purchase does not cost cheap, so many are trying to cut costs by assembling a kitchen headset yourself. This approach saves six to ten percent of its value.
Preparation for work
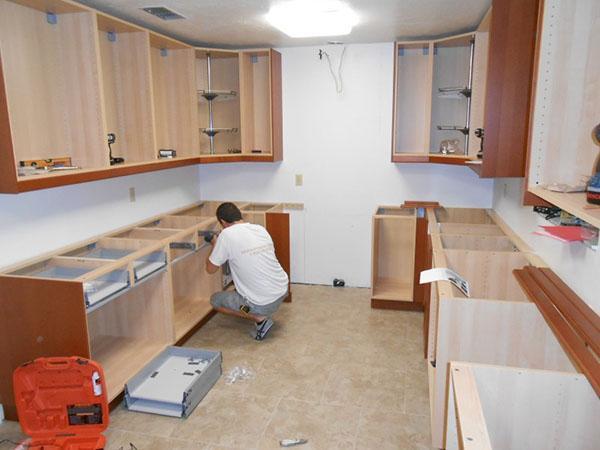
After all the furniture has been delivered and the flat cardboard boxes have filled the kitchen, you need to get to work.
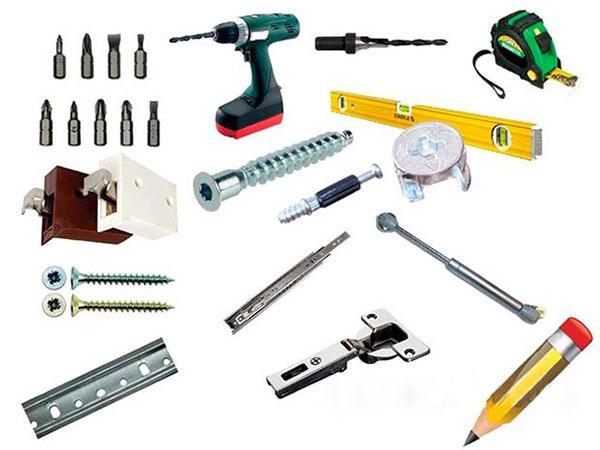
First, you should prepare a tool for assembling the kitchen:
- Screwdriver absolutely necessary, because the structural elements, as well as fittings, are fastened with screws and screws. You can also get by with a set of screwdrivers - should be at least flat and cross.
- Hex wrench. You don't need to buy it specially, it usually comes with a headset.
- A hammer and pliers can come in handy during all assembly steps.
- A breadboard knife is needed for unpacking boxes and other auxiliary work.
- A square, a level and a pencil will be needed when installing cabinets.
- A drill or hammer drill comes in handy when you need to attach wall cabinets and shelves to the wall.
- A hacksaw, jigsaw or jigsaw is necessary for sawing the countertop, cutting out holes in it for the sink and hob.
Unpacking will be an easy second step. Do not throw away papers found in boxes. They indicate the characteristics of the product and show the assembly diagrams of kitchen cabinets.
It is recommended to assemble and install the cabinet immediately after unpacking. This way you can save space and avoid confusion with parts from different products. Before starting the assembly, you should carefully study the information specified in the documents. Knowing the instructions for assembling the kitchen unit will help to correctly dock the elements.
If the set was ordered after installing the sewer pipes and laying electrical wiring, then all holes, cutouts for communications must be taken into account during manufacture.
If you have any questions, you should refer to the thematic articles on the Internet. They describe in detail the nuances of the assembly. Masters talk about the secrets of their work. You can also find video instructions with step-by-step assembling the kitchen.
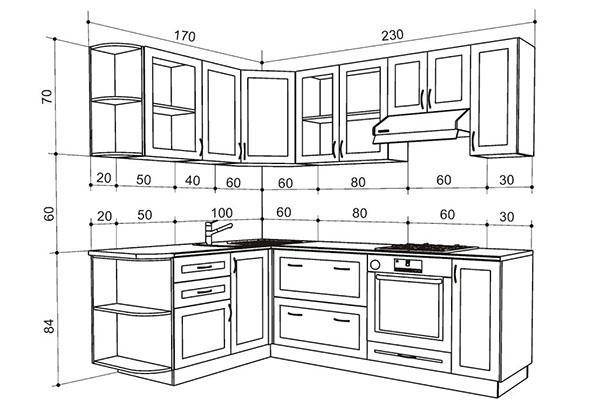
The order of assembly and installation of a kitchen set

Which cabinet to unpack first? It would seem not the most difficult question, but in order not to clutter up the space, you need to know the exact answer to him.
You should start with elements located, according to the layout of the headset, in the corner or near the wall. If you install another cabinet first, then later you will not be able to dock the headset with the walls of the room. This nuance must be remembered when starting the assembly of the kitchen set.
In the question: "which elements should be installed first, the top or bottom? " there are two different approaches.
On the one hand, it is customary to install the lower cabinets first. They are easier to assemble, and their placement does not require mounting wall hinges. They also will become the basis for determining the height of the wall cabinets.
On the other hand, the bottom set first will interfere with when mounting more complex upper ones.
Both approaches are confidently used by experienced craftsmen, therefore, where to start assembling the kitchen - everyone determines for himself. For beginners it is recommended to start with assembling and installing the lower pedestals.
The hinge of facades (doors) is carried out after the installation of the kitchen unit at the place of operation. This approach can significantly simplify the work.
Step-by-step assembly of a box for a cabinet or cabinet
Modern furniture is a set of modular designs. The assembly methods for the individual parts are typical for different models.
The work on the kitchen set begins with the assembly of the cabinet box:
- Chipboard elements are equipped with screws for eccentric ties.
- The side walls are placed vertically relative to the bottom.
- The screw heads are placed in special holes in the bottom ends.
- All screws are secured with eccentric ties.
Similar operations are carried out with the top of the cabinet. As a result you should get a box - the basis of the future pedestal. It remains only to secure the structure by installing the back wall. The walls are laid on the box from the side, where there is no laminated tape, and are fixed with thin screws or nailed nails. Sometimes the back wall is inserted into a specially prepared for it groove.
Make sure that the abutting elements are installed equally correctly. On the front side, the butt end is closed with laminated tape, on the back side there is an open cut of chipboard.
There is another option for assembling the box. In this case, the eccentric coupler is not used, and the walls are fastened with a euro-screw. The design is also reliable, but does not tolerate repeated assembly and disassembly. Particleboard can start to crumble, the groove loosen and the curbstone begins to wobble.
Assembling kitchen drawers is a process identical to the cabinet assembly. First, a box is created, then a wall is installed from fiberboard. In the case of a box, this wall is the bottom. In addition, the boxes have runners of one design or another. As a rule, they are installed at the factory. manufacturer.
I need to add a few words about how to assemble a corner the kitchen. There are two types of similar kitchen sets. For the first type, the angle is made out by two ordinary rectangular cabinets. For the second, apply special corner cabinet. Its assembly is not fundamentally different from assembling any other cabinet. A built-in sink is often installed on corner cabinets.
Installation of elements of a kitchen set
The main scope of work is the assembly of boxes. But a lot time is taken up by other important work. How to assemble a cabinet for a sink in the kitchen can be told in just a few words, but it may not be possible to get the job done as quickly work out.
An ordinary cabinet can be used for washing, or a special cabinet can be used. But the assembly of the case, in general, goes according to the standard plan. The only difference is that the sink cabinet has no back wall. This is done to facilitate the water supply and installation of the sewer plum.
The sink is installed in a special cutout in the worktop, which, when assembling a kitchen unit with your own hands, you will have to do yourself. This is where a jigsaw comes in handy.
Another option for installing the sink is to mount directly to pedestal. In this case, simply fix the metal part special clamps, and then screws.
How to install a worktop on a kitchen set? The installation of the table top begins with marking. Its straight cut defines the look of the kitchen.
But it is difficult to make a serious mistake, since special elements are provided to mask all possible joints:
- Plank for closing the joint when installing corner kitchen countertops;
- Skirting board for closing the gap between the table and the wall.
- After cutting, the tabletop is exposed relative to the wall and pedestals. Then they are attached to the lower cabinets with self-tapping screws. Moreover, they are also additionally fixed.
The table top should have a front allowance of about 3 cm.When sawing, a 1 cm allowance along the edges is left.
To connect kitchen cabinets together use furniture screeds. The assembly of the elements themselves is extremely simple. More difficult position the cabinets in total and drill through holes correctly. Specialists use clamps to secure the cabinets to each other and only then use a drill.
Hardware installation and adjustment
For the correct installation of the tabletop, it is necessary that the floor stands have been aligned. This is achieved using the adjustable feet. Installation legs on kitchen furniture is carried out using self-tapping screws supplied with headset. Places for their installation are usually determined in advance, during control assembly at the factory. Adjustment is carried out using level.
To make the headset comfortable to use, you must adjust the hanging kitchen cabinets. First of all choose suspension height. It must be at least 450 mm. The most popular method hinge - on the rail. Strong metal hooks are attached to the cabinets. decorative plastic case that cling to the rail. They're called "Awnings" or "suspensions". In this case, the adjustment is carried out using special screw in the device case. You can compensate for the error installations up to 15 mm.
Assembling a kitchen on your own is not at all difficult. To do this, it is important to study the instructions, advice of experienced specialists and carefully plan your actions. Observing the scheme and order of assembling the kitchen unit, you can avoid many minor troubles and protect yourself from major problems. The result of the work will be invaluable experience, an excellent kitchen set and successfully saved a large sum of money.