We do drip irrigation from improvised means with our own hands
 Arrangement of irrigation systems in the country or in the garden is one of the main factors for obtaining a good harvest. The most effective method of irrigation is recognized as a point metered system of moisture intake under the root of each plant bush. Gardeners, unlimited in finances, buy industrial irrigation systems, and savvy folk craftsmen make drip irrigation from improvised means with their own hands.
How to make drip irrigation from improvised tools with your own hands

Option number 1
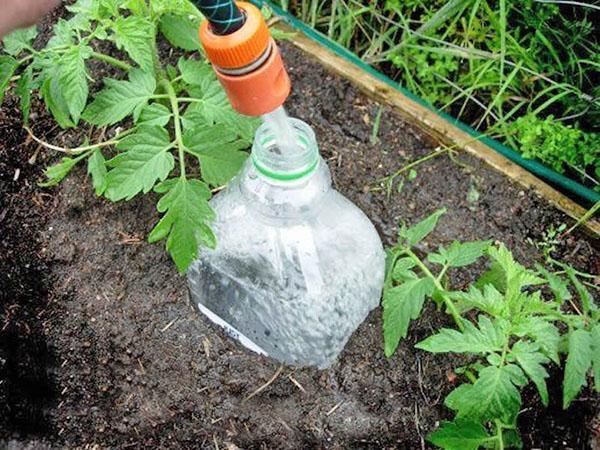
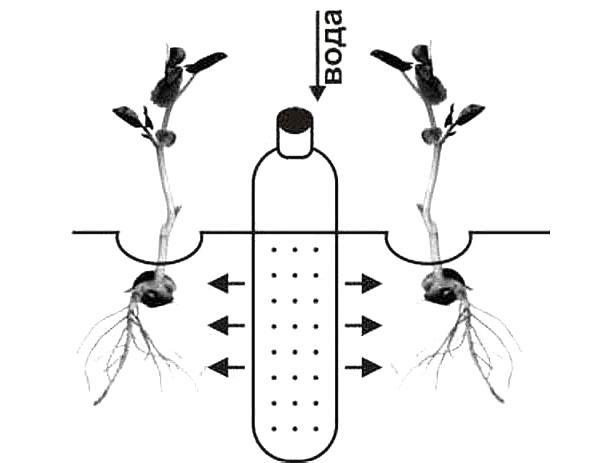
 We pull out a small hole between the beds and install a 1- or 2-liter plastic bottle... In the cork located at the top, we make holes for air access. On the sides of the container, we pierce thin holes in a checkerboard pattern for moisture to flow from the bottle to the roots of nearby plants.
 For plants located a little further from the bottle, water can be provided through additional tubes inserted into the openings of the bottle.
Option number 2
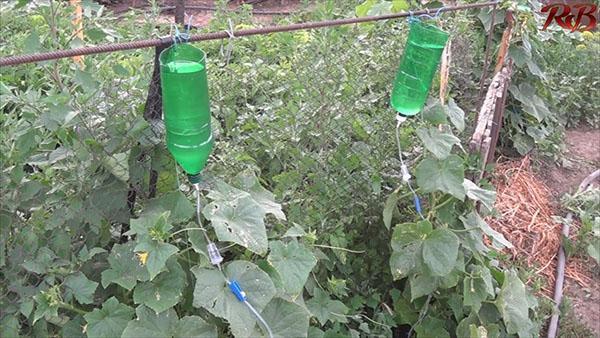
 We install supports above the bed on both sides. A beam is placed on the supports, to which water bottles are suspended. Small holes are punctured in the lids to drain water from the containers horizontally laid on the beam. Alternatively, the bottles are hung vertically downwards. The necessary water will flow to the roots through the fine holes made in the lid or through the cleaned, used pen refills inserted into the containers with the nib removed.
Before use, the bottles are cleaned of labels, thoroughly washed and dried.

Option number 3
 A little patience and skill is needed to set up a do-it-yourself drip irrigation system from medical droppers.
This will require:
- hoses made of rubber or pipes made of polyethylene, polyvinyl chloride;
- connecting adapters, fittings, tees, end caps;
- used medical droppers.
To collect the irrigation system according to a previously drawn up scheme:
- the hoses (pipes) are laid out;
- through adapters, they are connected to each other and to the source of water intake.
- we put plugs on the edges.
- in the hoses (pipes) opposite each plant, using an awl, we make small holes into which we tightly insert the plastic ends of the droppers. Using the wheel, we adjust the water pressure.
Before use and each subsequent season, the entire system must be thoroughly rinsed. The fine holes in the irrigation system can gradually become clogged. It is recommended to install a fine filter at the water inlet.
Summer residents have learned to make homemade filters for drip irrigation do it yourself using pieces of nylon socks or tights. An empty plastic container can be used to make the filter, in which the drugs were stored. Connecting pipes are tightly attached to it, inserted at the entrance to the irrigation system. Nylon elements are inserted into a plastic jar, which is tightly screwed with a lid. It is recommended to use filters with a passage size three times smaller than the openings of the droppers used.
DIY drip hose
 If a home-made drip irrigation system is being built with a conductive hose laid out on the ground or laid on a support, its functions can be performed by:
- ordinary single-layer or multi-layer rubber hose;
- a hose made of polyvinyl chloride;
- silicone hose.
When it is planned to bury the plumbing system in the soil, it is safer to build it from plastic or polypropylene pipes. Such a conductive hose will be less susceptible to corrosion and temperature extremes.
In any case, the conductive hose must be suitable for making a hole in it for inserting medical or other types of droppers with tips and not let water through in places not intended for irrigation.
Homemade drip irrigation system
Drip tapes are popular with gardeners. They are also made with their own hands. The belt drip irrigation system consists of:
- main pipeline;
- main distribution pipes;
- tapes made of plastic with uniformly spaced holes or perforated hose tapes.
The optimal choice of material for the manufacture of wiring is polyethylene pipes for irrigation. It is convenient to install dispensing connectors, tees, transitions, valve and ball valves, other connecting elements with a water intake source and drip tapes on them. After preliminary cleaning and checking the pipe routing, plugs are placed along their edges. The drip tapes are attached to the distribution pipes using starter fittings and adapters. During a preliminary check, the performance of each dropper is checked. In case of clogging, mechanical cleaning is carried out. Drip tape or seamless tubes are buried at a shallow depth of 2 to 3 centimeters to prevent the irrigated roots from entering the system.
A typical do-it-yourself drip irrigation scheme looks like this:
Instead of drip tapes for homemade drip irrigation, seamless PVC tubes with emitters are used.
As a source of water, a volumetric filling plastic tank is used, installed at a two-meter height to ensure the required water pressure in the system. The calculation of the water supply is carried out on the basis of taking into account the useful area occupied by the beds, the type of soil, the number of plants and the need for moisture (from 0.8 to 1.5 l / hour). Soft rain or melt water is preferred over tap water for irrigation. It is more useful for plants when its temperature is identical to the temperature of air and soil.
Fight pipe clogging
For the simultaneous feeding of vegetables, water is often added fertilizers... It should be remembered that to prevent them from clogging the conductive hoses, only special soluble fertilizers should be used.
The connection of the tank with the inlet to the irrigation system should be made just above the bottom. This will reduce the likelihood of clogging of the pipes by debris settling to the bottom of the tank.
To prevent clogging of pipes by chemical impurities of iron, aluminum, magnesium, phosphorus oxides accumulating in hard water, acid additives are used. From contamination with mucus, microorganisms, a thorough flushing is periodically carried out with the removal of plugs and water chlorination.
Upon completion of field work, we disassemble the irrigation system, thoroughly rinse and dry it to prepare for work next year.
Automated drip irrigation
 Advanced wizards have learned to customize drip irrigation automation using:
- minicomputer processor, solenoid valves, humidity, temperature, working pressure level sensors, single or multi-channel controllers;
- a timer installed on the water supply pump, with its help, the time for the supply and shutdown of water is regulated.
The minicomputer configures up to 12 individual modes of water supply for each branch of the irrigation distribution on the site. The volume of water in the system is regulated taking into account the automatic analysis of incoming information from temperature and humidity sensors. Programmable controllers are installed at the entrance to the irrigation system after the valve and on the distribution lines at the points where drip tapes or special seamless pipes are connected. They automatically give the command to turn on and off the irrigation to the installed solenoid valves.
Automatic drip irrigation systems significantly reduce the need for water use, time for observation and maintenance of beds.
The main advantages of using a homemade drip system
 Do-it-yourself drip irrigation from improvised means significantly saves financial resources for the purchase of the necessary materials and equipment. The second plus is the quick possibility of replacing a damaged part of the system with a spare one: a craftsman who has built drip irrigation on his site will quickly see its weak points and repair them with the help of available spare materials (or purchase them at already familiar places of sale).
General benefits of homemade drip irrigation:
- Beneficial effect on plants. Moisture flows pointwise under the roots, without clogging the soil, without creating a crust. Waterlogging is excluded, the roots breathe intensively the entire cycle of growth and ripening of fruits, vegetables and berries. Plants are not injured, unlike a significant stream of water from above when sprinkling.
- Significant savings in water consumption, reduction of wear and clogging by impurities, mucus of the irrigation system.
- Reduced crop losses from pests and diseases. Fungicides, insecticides, and other protective agents applied to the leaves during processing are not washed off with running water during irrigation.
- Drip tapes are conveniently located even in areas with uneven terrain; the formation of puddles in some places and drought in other beds are not allowed.
- Weeds grow less because they do not receive water. In places where they grow, the soil remains dry.
A uniform, point-like water flow to the roots with a temperature close to the soil temperature ensures stable yields in the beds.
Be patient and skillful, make your own drip system on your backyard. Save labor costs and water consumption in the future, enjoy a good harvest!