Assembling a homemade cultivator
 The cultivator helps to dig up the soil in the area. Digging speed when using the equipment is significantly increased. It allows you to save energy when preparing beds for winter or spring. You can buy a factory cultivator, or you can make one yourself. To assemble a homemade assistant, you will need:
- drill with a powerful gearbox;
- reducer from the grinder;
- gears;
- rear and front sprocket from the Karpaty motorcycle;
- chain from the "Karpaty" motorcycle;
- bolts and nuts of different diameters;
- metal profiles for welding the body and chain guides;
- stud and bearings with a diameter of 16 mm.
Tools used during assembly:
- Bulgarian;
- file for metal;
- welding machine.
When assembling the body, it is necessary to select the dimensions of the metal profiles for the dimensions of the working body cultivator... They depend on the size of the drill and the external gearbox, so there are no clear instructions for cutting metal profiles, only approximate dimensions are indicated.
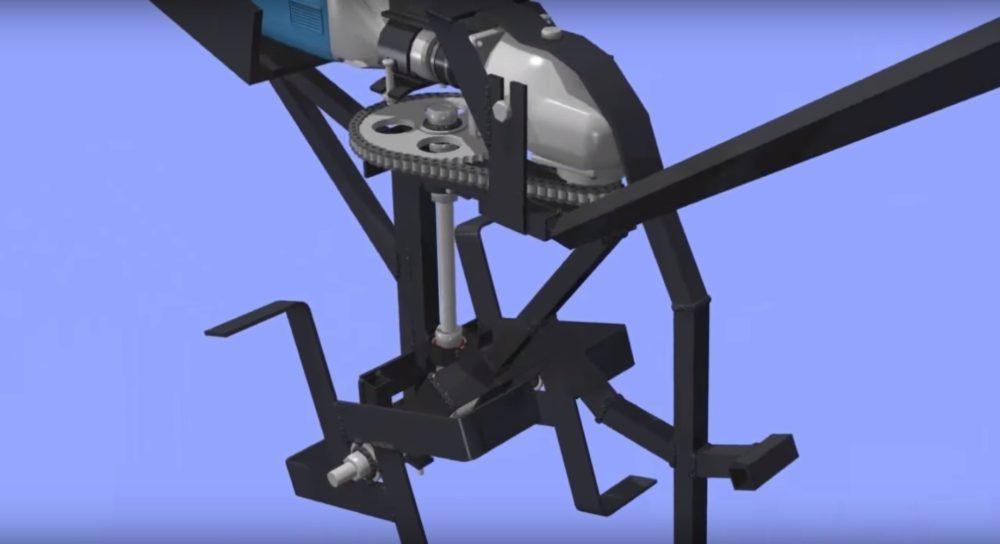
Assembling the cultivator working body
The reducer from the grinder must be fixed in the drill. Weld a metal plate horizontally between the drill and gearbox. On top of it, install and weld a square profiled pipe. It is necessary to make a bracket with a radius equal to the radius of the drill gearbox and weld it to the bottom of the plate. Weld 8 mm bolts to the free edges of the bracket.
Next, make a pressure device.
The edges of the pressure plate should be bent in the opposite direction from the applied force so that the bolts do not loosen during the work of the cultivator.
The holes for the bolts must be made using a grinding disc fixed in the grinder. Next, on top of the gearbox from the grinder, a beam is welded, formed under the upper gearbox cover. A hole is made on it and the gearbox is fixed with a bolt. In place for the grinder discs, screw the front sprocket from the "Karpaty". The working body of the cultivator is assembled.
Body assembly
The body is welded from metal profiles. Bearings are welded to two beams, which are pre-fixed in self-made casings made from a water pipe with a diameter of 32 mm. Then a metal stud is inserted into the bearings. Next, two metal profiles are connected into one structure, fastened with a horizontal beam. Then a gear is screwed onto the shaft. The second section of the stud is also completed with a pair of bearings and a gear. A horizontal profile is welded onto the shaft mount.
The second section of the stud is aligned so that the height of the upper cage matches the height of the profile. The vertical profile is fastened to the hairpin using a triangle of beams. Then, on the free end of the hairpin, put on the rear sprocket from the "Karpaty" and weld the upper part of the cultivator with the body using diagonal sections of the profile. A chain is put on the stars. Handles are welded to the upper part and additionally connected with a horizontal plate. Two "irregular cross" blades are formed from the profile sections and screwed onto the shaft.
The cultivator must be equipped with a brake claw that is welded to the rear of the body.