Do-it-yourself Christmas tree toy dog
 On the eve of the new 2018, which will be held under the auspices of the dog, I would like to reflect its symbol in holiday decorations. Each hostess makes interesting dishes with themed decorations, costumes for children, and so on.
Children also love to take part in preparing the home for the holiday. But besides the usual annual carving of snowflakes, they probably want to do something interesting. Why not fulfill the desire of little fidgets? Moreover, when making crafts, imagination, fine motor skills of the hands develop and the bond between parents and children is strengthened.
A fairly simple embodiment of what you want is a do-it-yourself Christmas tree toy. This will be discussed below.
What can you make a toy from?
- paper;
- felt;
- paint and Christmas ball;
- pom-poms;
- cardboard;
- salty dough;
- plasticine;
- any fabric and padding;
- shells;
- and many many others.
It is enough just to include imagination and creative thinking. Now let's take a closer look at a few easy-to-make Christmas tree decorations per year of the dog.
Several master classes
Making New Year's crafts will not only decorate your home for the holiday, but can also bring your family closer. Many simple and beautiful Christmas tree crafts for the new year 2018 can be done with children.
Jerk dog
This craft is easy and quick to make, but it brings a lot of joy to children. You can hang it on the tree, or you can just play with it. For execution we need:
- cardboard;
- awl or gypsy needle;
- small buttons;
- elastic thread;
- strong thread, thin cord or wire.
 First you need to draw a future Christmas tree toy in the form of a dog. Now we break the product into parts and draw each of them separately. Next, you need to cut them out and use them as a stencil. We outline the details on cardboard and cut them out.
We mark the places where the legs and tail join the body, make holes.
For parts to be movable, they must be freely attached to the body. For this you need a wire with a button.
 First, the mount is threaded through the holes on the body, and then into the moving parts.
First, you need to tie the legs together and tie the tail to the hind leg with an elastic band.
On the front side, we leave a button and thread a wire through it and a hole, fix it. We get a dog with moving legs and a tail.
It is better to take buttons transparent or to match the finished dog.
You need to tie a string to the elastic band that connects the foot, for which you will later pull it to move the dog.
At the end, you can attach a stick to hold the dog or a loop of ribbon to hang the toy on the tree.
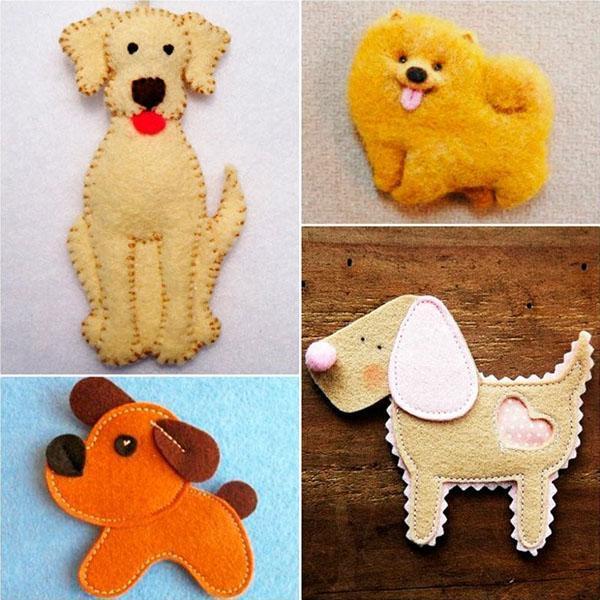
Symbol of the year made of felt
This material is very popular among both novice needlewomen and experienced craftswomen. The best part is that the felt does not crumble at the edges, and therefore does not require additional processing.
Christmas toy dog made of felt can be flat or voluminous. To make a flat one, we need:
- felt of different colors;
- scissors;
- threads;
- cardboard;
- pen or pencil.
For a voluminous toy, you will need more filler. Cotton wool is quite suitable for these purposes.
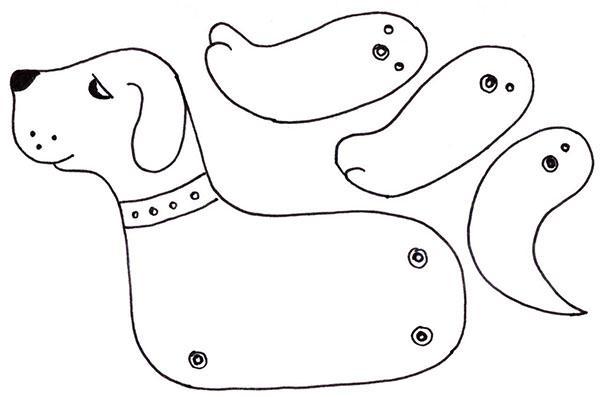
Let's get to work.First, draw the details of the future dog on cardboard. These will be patterns. Cut them out and circle them onto felt.
If you do not know how to successfully break a dog into parts, use the patterns below.
One of the most popular Christmas tree decorations is a dog with a spot around the eyes and multi-colored ears. If you are doing it, you will need two colors of felt.
From the main one we cut out two parts of the body and one eyelet. The second color is needed for the second ear and the spot around the eye. You can also cut a contrasting collar strip and a black nose.
First, we sew a nose and a speck on the front part of the body. Next, we outline and embroider the eyes and mouth.
For sewing on a speck and connecting parts, you can choose contrasting threads that will not be knocked out of the main color scheme.
Now we fold the front and back parts of the torso, sew them along the edge, leaving room for stuffing the toy. We fill the toy with cotton through the remaining hole and sew it to the end.
The ears are sewn on the back, then we put the collar. It is important not to tighten it, otherwise it will not be beautiful.
The collar is secured at the back with a button. Now the volumetric Christmas tree toy symbol of the year of the dog is ready. You can additionally sew a loop from the ribbon to hang it, or just put the dog under the tree.
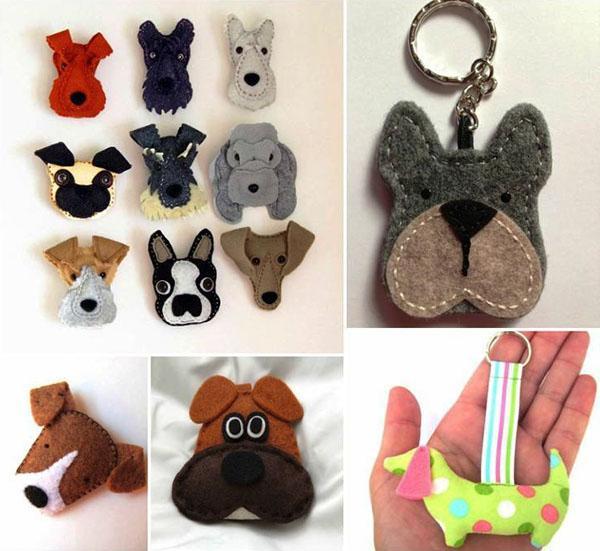
A flat dog will also look great. Muzzles are usually made like this and it is much easier than a voluminous toy.
Here, too, you need a cardboard pattern. We draw ears, a face, a nose and a speck.
From the selected felt colors, you need to cut the listed details according to the cardboard pattern.
If you use two colors, the craft will look brighter and more interesting.
Now it remains only to connect all the parts with a thread and a needle. Eyes, antennae and mouth need to be drawn and embroidered. You can also replace the eyes with buttons.
At the end, you need to sew a hanging ribbon between the ears. Now, as promised, we bring to your attention patterns of a Christmas tree toy made of felt.
Symbol of the year on Christmas balls
If you have no desire to mess around with sewing, but you love drawing, this is a great option. There are two ways to make these toys. You can paint ordinary solid balls or make toys from old incandescent bulbs.
It is very easy to make Christmas balls with a dog. For work we need:
- plain Christmas tree decorations in the form of balls;
- any degreaser;
- primer;
- acrylic paints.
We take the ball, degrease it and prime it. Now you need to make a sketch with a pencil, and then paint it with paints. You can depict a landscape with a dog or draw a face.
A do-it-yourself Christmas tree toy dog from an old light bulb is made in the same way. Degreased, primed, painted.
To close the base of the light bulb, you can make ears and a Christmas hat from felt. Attach to regular PVA.
Decoupage
Another rather simple way to make a Christmas tree toy with a picture of a dog with your own hands. Here you will need the following materials for work:
- three-layer napkins with a picture of a dog;
- PVA;
- Christmas ball;
- brushes;
- degreaser;
- acrylic paints;
- water-based varnish;
- nail glitter or glitter polish;
- sequins or tinsel for decoration.
First, degrease the toy, then apply paint - it will act as a background.
It is better to apply paint in 2-3 layers.
Cut out a picture of a dog from a napkin and separate the top layer. Using PVA, we attach the image to the toy. When the glue is dry, you need to varnish the product and touch up with paints.
Finally, decorate the ball with sparkles and chopped tinsel, giving it a New Year's mood.
Master class in pictures on making a fluffy dog
As you can see, making decorations for the Christmas tree with your own hands is simple and interesting. And if you involve children in the process, it is also useful.Turn on your imagination, make together, such souvenirs can even be made as a gift to loved ones. Upcoming holidays!