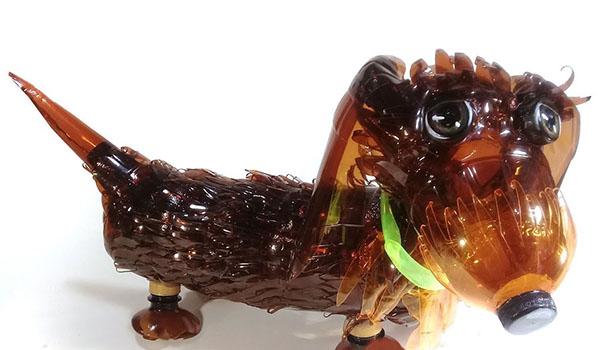
Original toy - dachshund from plastic bottles
 Dachshund made of plastic bottles is an original interior detail that does not require special skills to make. In order to make it, you need to be patient and make such beauty in just a few hours.
Required tools and materials
In order to make a dachshund from plastic bottles, you need to stock up on:
- Brown bottles: 5 pcs. with a capacity of 2 liters, and 2 pcs. - with a capacity of 0.5 l, 1 l and 1.5 l.
- Yellow bottle - 1 liter.
- A bright green bottle of any size - for a collar.
- Scissors.
- With a glue gun.
- Acrylic paints - black, brown, white and green.
- An old iron or candle in a sturdy candlestick.
- Hairdryer.
- Bottle caps.
All bottles need to be labeled and treated with nail polish remover.
In addition to the doggie, a huge number of other decorations are made from plastic bottles for playground, recreation areas.
Dachshund from plastic bottles - step by step instructions
Each part of the amazing dog is made separately, and then all the parts are assembled into one whole.
Making the torso
- Take two bottles - one with a capacity of 1 liter, and the other 1.5 liters. From each you need to cut off the upper part - where the flask begins to decrease.
- On the smaller container, it is necessary to make incisions in the form of a fringe. The strips should be 1 cm wide and 2-3 cm long.
- You need to connect these two bottles - insert one into the second, and glue them with the help of fringe petals. To do this, coat every 2-3 petals with glue. That's it, the base of the torso is ready.
- We prepare the wool - you need to cut all the two-liter bottles horizontally into strips 15 cm wide. Then cut each one into thin triangular stripes - also creating a fringe. The finished strips need to be warmed up over candles or an iron to shape.
- Prepare a place for gluing the head and tail. You need to take 2 cut off necks already with caps screwed on them and glue them on the body. The piece for attaching the tail should be shorter (3-4 cm high).
- Glue over the body with "fur-fringe", applying strip to strip.
Making the head
- Nose. Cut off the yellow bottle, measuring 10-12 cm from the neck and make a fringe along its edge: the strips should be 3-5 cm long and 1 cm wide. Screw the lid on the neck.
- Muzzle. Cut a liter bottle of brown so that its length from the bottom should be 15 cm.From the cut edge, you also need to make cuts in the form of a triangular fringe: the strip is 0.5 cm wide and 7-8 cm long.Insert the bottom into this part plastic containers 12-15 cm high. fix these parts with glue.
- Connect part 1 to part 2 with glue.
- In order to make the head more realistic, you need to lower the nose a little relative to the head - turn it a little at an angle relative to the head and fix it.
- Prepare a place for attaching the ears - the cut necks, with the caps screwed on them, are glued to the place of the subsequent fastening of the ears.
- Ears are made - 15 cm long and 8-9 cm wide. You can cut them out of containers of any size. Since the ear bends at the top, you can round off sharp corners by simply heating the part above the candle.
- Attach the ears to the head, pointing them downward so they don't stick out.
- To make eyes - take two caps of the same color and attach cilia from scraps to them, and then attach the eyes to the head.
Making paws
Paws are made from bottle necks - by cutting 4 pieces 5 cm long. Each piece must be visually divided into 4 pieces. The incisions only need to be made at three marks - these will be the toes. They need to be rounded a little, and the edges need to be processed over the candle. A cap must be screwed onto each neck.
Assembling the finished product
- Glue the tail to the body by twisting a 15 cm long strip in the shape of a pyramid.
- Attach the legs to the product, cutting them slightly at an angle.
- Attach the head to the body.
- View and glue where you want the "wool".
- Dry the entire product with a hair dryer so that the glue sets faster and in order to remove the cobwebs of glue. In addition, the "" hairs, when heated, bend and lay down beautifully.