Simple ways of weaving trees from beads
 At all times, people admired the work of great masters and needlewomen and tried to imitate them. Original products - beaded trees are becoming more and more popular. With their beauty and uniqueness, they attract the attention of not only handicraft lovers, but also those who want to gain a deeper understanding of this skill.
The fascinating handmade process, when real masterpieces are created from miniature beads, attracts more and more art lovers. To understand the secrets of this handicraft, it is advisable to show patience, listen to wise advice and allocate enough time. After all, creating trees from beads is quite difficult. Each twig and leaf should be given special attention, and then, by connecting individual parts, get a pretty product. To help novice needlewomen improve their skills, many special schemes of the creative process have been developed. They are based on the characteristics of different types of trees that can be created with beads.
Acquaintance with the basics of mastery
- stringing bugles on a wire;
- creating neat loops;
- connection of structural parts;
- understanding of working schemes;
- correct color matching.
Having mastered the basics, you can start creating a tree from beads with your own hands. To do this, you need to prepare the following set of items:
- suitable beads;

- thin filamentous wire;

- rod for the barrel (you can take a thick wire);
- accessories for decor (stones, beads);
- base or pot for the product;
- alibaster (gypsum);
- convenient nippers, scissors, tweezers.
It is important to take into account the fact that each tree has its own characteristics, therefore there is no single scheme. The photo shows different types of bead trees made by experienced craftsmen. Taking into account the main principles, you can achieve similar success and enjoy the creation of your own hands.
To make the product elegant and beautiful, it is better to use thinner wire. It is much easier to work with it, especially for novice students.
The process of creating a tree from beads includes these simple movements:
- 7 beads are strung on a thin wire about 50 cm long. Placed in the center.
- Bend the metal thread to form a loop. In this case, the beads are at the top.
- The ends of the wire are twisted and spread apart in different directions.
- Having retreated from the place of twisting on the right side at a distance of about 1.5 cm, 7 pieces of bugles are again recruited. Do the same on the left side. The ends are curled. In this way, the branches of the future tree are weaved. The more you can make them, the more attractive the product will look.
- When the branches are ready, they start building. To do this, they are connected in pairs, twisting at the base.
- Branches are attached to a dense rod or thick wire. The result is a trunk of the structure that holds the braiding elements.
- The tree is placed in a beautiful vase or flower pot. It is pre-filled with plaster or plasticine.
These principles are applied to the manufacture of different types of trees, not forgetting that each design has its own individual characteristics.
Tips for those wishing to study
The easiest way to make a beaded tree is the manufacturing process cherry blossom... In the land of the Rising Sun, this plant is considered a symbol of the awakening of nature and female beauty. And for novice needlewomen, it is a good way to acquire good craftsmanship skills. To work, you should purchase the following materials:
- beads of light pink color;
- flexible wire (necessarily of different thickness);
- masking tape;
- paints or gouache.
First of all, the flexible wire is cut into pieces 20 or 30 cm long. On each of them beads are strung, 5 or 6 pieces. After that, the ends of the wire are connected to make a beautiful leaf. Next, a branch is formed. At the same level, 2 petals are tied against each other. Then they are connected already 3 pieces together.
To make a trunk, the twigs are wrapped with masking tape, which is later painted with paint or gouache. The finished structure is attached to the base using plaster or alabaster. It is important to work carefully so as not to stain the sakura petals.
For a beautiful tree, you need from 90 to 120 branches. Therefore, you need to patiently and slowly move towards your goal.
These simple rules for beginners help beginners to create their first tree from beads and enjoy the product of their hands.
Master class is a reliable guide for needlewomen
The desire to learn and improve in any business is commendable. You cannot do without it in acquiring needlework skills. Beading is considered not a difficult type of creativity, so pretty trees are obtained even by amateurs. Master classes play an important role in this, with the help of which you can create chic things.
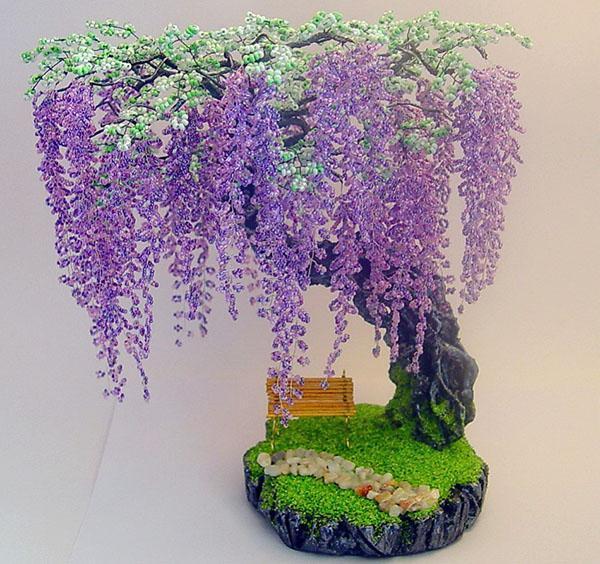
Amazing wisteria - video master class
Russian birch weaving option
The cute tree with cascading branches remains at the peak of its glory for centuries. A lot of poems have been written about him and pictures have been drawn. Lovers of needlework could not resist it either. Using a master class of weaving trees from beads, in particular birch, it is easy to create your own masterpiece.
To work, you need to prepare tools:
- beads of four shades of green (preferably different contrasts);
- wire: 0.3 mm, 1 and 3;
- threads;
- glue (PVA can be used);
- acrylic paints;
- wide and narrow tassel.
When the items are at hand, you can start the creative process.
First, they take a wire 0.3 mm thick and cut a piece 40 cm long. 9 pieces of beads are strung on it, and placed in the center of the line. Step back 6 cm from the edge of the wire to twist the loop beautifully. Up to 9 of them are made on one thread, observing an interval of 1 cm. Then the strips are bent in half, leaving one loop in the center. Such copies need to be made at least 15 pieces. Similarly, another 57 branches are weaved, consisting of 11 loops. Large branches will be evenly distributed over the tree, and small ones will serve to form the crown.
Bugle beads of various shades of green must first be mixed in order to be strung on a thread in any order.
Competent weaving from beads implies constant control of the number of items to be joined so that the trees are brightly beautiful. Therefore, the next step begins with a simple calculation of the starting material. Then the branches, which consist of 9 loops, are connected into small bouquets. There should be 5 of them.
A 1 mm thick wire is screwed to long branches and set aside. Then a structure consisting of two barrels is formed. One is made from 3 branches, the other from 2. After that, a 3 mm thick wire is attached to each of them, wrapping it with threads.
To have birch it turned out a beautiful crown, 12 pieces of long shoots are tied to the upper edge of the trunk, consisting of 3 branches.Another 7 elongated branches are attached to the other two. The connection is made so that the thick part of the structure rises 2 cm above the product. The hanging threads are wrapped with tape, leaving the ends below to make roots out of them. As a result, they will serve as a reliable fastening of the tree to the base.
Gypsum or alabaster is poured into a small container and a birch tree is installed in it. You need to fix it so that the structure is right in the center. After 12 hours, when the liquid hardens, they begin to decorate the trunk.
To prevent paint from getting on the green birch branches, they can be hidden under foil.
First, a primer is applied using PVA glue. After a few hours, the barrel is covered with white paint in two thin layers. The black decor is applied after the main layer has completely dried. After waiting some more time, they remove the foil, straighten the branches and admire the result of their efforts.
Patterns of weaving wood from beads
Video instruction for making willow from beads
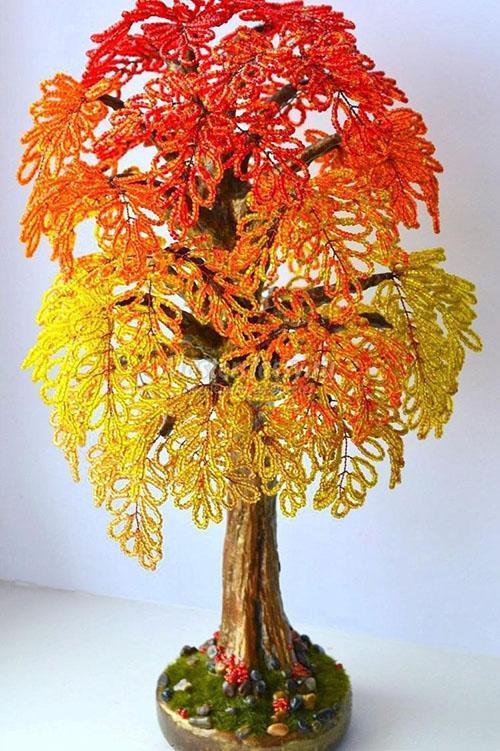
Winter beauty - mountain ash
Many needlewomen noticed that special schemes help them to create magnificent trees from beads. They consist of a textual guide and are often accompanied by a set of pictures. The main thing is to follow all the instructions from the masters in order to improve your skills.
For weaving rowan it is necessary to prepare not only beads, but also bright red beads resembling ripe berries. Since the branches of the mountain ash consist of 9 leaves and a pretty bunch, you will have to work hard to reach the final goal. But do not give up without testing your strength.
The first step is to cut a wire up to 70 cm long. String a green bead on it, placing it in the very center. The next rad is formed by passing both ends of the wire simultaneously through 2 bugles. You need to pull up so that they are on top of the previous row. According to this principle, all 9 petals are collected.
The second step is berries. A black bead is put on a 70 cm wire. Then both ends are passed through the hole of a large scarlet bead. Then they are passed through brown beads. One bunch should contain at least 16 pieces of berries.
The third step is to combine berries with leaves. For such a tree, up to 100 such branches are required. The process is carried out in the usual classical way.
The final stage - the finished branches are collected in a bunch, forming a lush crown. The ends of the wire are twisted around a rod that serves as the trunk of the tree. The structure is dipped into a plaster solution and the autumn beauty is ready. The product can be used to decorate your home interior.
Despite the fact that flowers and beaded trees do not need moisture and sunlight, they do require careful maintenance. To keep them looking flawless, it is important to regularly dust them off. To do this, you can use a soft brush. Under the tree preferably not near a window. Due to sunlight, beads quickly lose their color, taking on a dull appearance. Such simple rules help to admire the creation of your hands for a long time.
Step by step weaving of orange tree from beads