Material selection rules and the process of making wooden products
 Every house should always have wood products, made by hand or bought from a master. These luxurious items create an atmosphere of home comfort and warmth, so they never get old. In addition, such things testify to the excellent taste of the owners. The combination of elegance and splendor underlines the key design idea. Of course, those who live near the forest do not need to worry about the supply of raw materials for carpentry work. Another thing is if you need to buy it, then you should know some of the features of the materials. However, processing, drawings and installation will interest everyone.
Timber selection
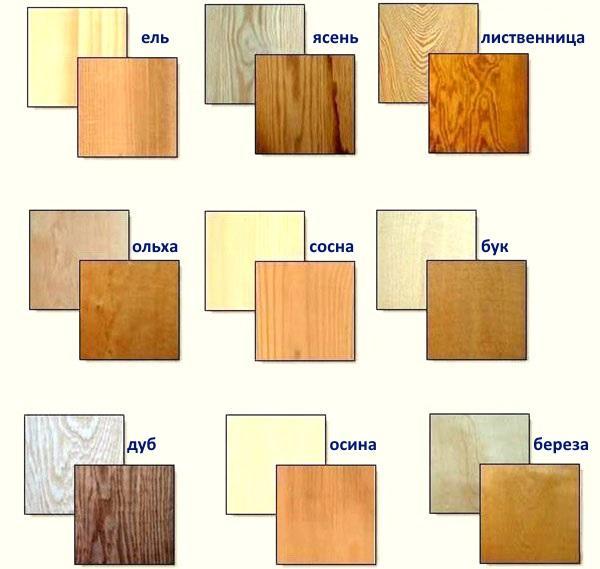
- pines and spruce;
- poplar;
- fir and cedar;
- chestnut;
- and you;
- aspen.
They are mainly suitable for the production of facades, because they feel great in a humid environment. There are practically no problems with such raw materials. The cut pattern and color are very beautiful. These timber are successfully suitable for creating children's furniture from wood.
 In the case of hard rocks, some of them require dexterity as well as special tools / equipment. Novice joiners are recommended to work with:
- apple and rowan;
- walnut;
- oak and beech;
- maple;
- sycamore;
- ash;
- elm.
A real professional should give preference to white acacia, boxwood, dogwood, yew or pistachio tree. Nevertheless, beech and oak boards are used most often. The strength and durability of such products captivates consumers.  Beech is ideal for making curved objects. But due to its hygroscopicity, it is not relevant for outbuildings or kitchen structures. In this case, oak will be an alternative. Moreover, a bed, chest of drawers or a bookcase from it will look solid. To do this furniture you will need helpers, since oak wood itself is very heavy.
The favorite of many craftsmen is pine. It's a pleasure to work with her. It is suitable for creating mini cabinets, doors, decorative items and shelves. Nevertheless, this wood has low impact resistance and does not withstand strong mechanical loads.
Preparatory stage
Competently selected material is half the battle. Now you should correctly process the wooden parts, and then assemble them into one structure, guided by the drawings. Mold, rot, and insects are ruthless pests even for heavy-duty monoliths. Therefore, the surface of sanded boards / solid wood should always be treated with an antiseptic and anti-perine. You can also take as source material:
- OSB plate;
- type-setting shield;
- plywood;
- Chipboard.
Boards and planks should be well dried to make them easier to work with. At home, wood is dried naturally. The temperature of such a room is maintained within 12-18 ° C, and the period of this process lasts 2-3 years.There should be gaps between the bars to serve as ventilation. There is a faster drying method. It is advised to wrap a log or an object already made in paper / newspaper (it should be replaced every 48 hours) and wrap it in plastic wrap.
It is necessary to choose the right season for harvesting timber: late autumn or winter months. During this period, the plants are dormant, and moisture does not circulate in them.
If you need to make furniture from solid wood, then you should not neglect the main stages of surface preparation:
- Grinding. A variegated sandpaper or a grinder will help to carry out the work quickly, and most importantly, efficiently. It is carried out in several stages: before and after installation.
- Getting rid of glue and resin. Such substances clog the porous structure of the wood, and the surface becomes dull. After cutting off the knots and wiping off the resin, you need to treat these places with a special composition (shellac solution or white spirit).
- Application of disinfectants. Then it is worth soaking the most vulnerable areas with oil. When everything is dry, you can move on to the next stage.
- Sealing grooves / cracks. This can be done with a thick putty (water or oil base) and special wax sticks. It is advisable to choose the color to match the future wood product. After drying, you need to clean up the unevenness again.
- Painting. First, you should apply a primer or varnish / stain. The base layer is applied diluted. Rub the paint / varnish well to avoid drips. Three layers is the best option for all surfaces.
Alkyd and oil dyes are first applied vertically and then horizontally. Acrylic is painted along the fibers.
Timber is dried using special installations (based on infrared radiation), microwave ovens or drying cabinets. In addition, some soak the bars in boiling water (5 minutes) followed by rubbing with salt. And only after 7 days of drying, the board will be ready.
Portfolio of works
The first step is to calculate the consumable, how many beams / boards will go for each product. Then it is advisable to dry them, treat them with an antiseptic, remove defects and grind them. Now that everything is ready, you need to make a detailed drawing of the planned furniture or structure.
Instructions for creating a stool
It will not be difficult for any man to make simple wooden stools. The structure of these structures is very simple, as are the stages of the work itself. The whole process is as follows:
- Cut 4 boards (60 cm) that will serve as legs. Cut each edge with a miter box (45 °). As a result, the length of each will turn out to be 48 cm.
- Connect the legs in pairs crosswise. To form a cross, it is worth making small grooves in the center. The depth is about half the side. After which they should be tightly fastened, then they will not protrude.
- Connecting bar for crosspieces. Its width depends on the dimensions of the stool. Screws are used as fasteners.
- Seat base. A bar is attached to each individual crosspiece. The seat consists of plywood and a thick piece of foam rubber (dimensions 40x60 cm). From above, all this is covered with a dense lining, and then a finishing fabric, which is fixed with buttons.
- Assembly. Now it is important to connect everything securely.
The caps of the self-tapping screws can be covered with wooden washers, having previously made recesses for them.
It is recommended to paint the parts before attaching the seat. The color should be chosen to match the fabric or interior of the room. In the kitchen, many will want to make a stool with split legs. Each craftsman individually determines the height and width of the product. Blanks consist of:
- legs (length 43 cm);
- drawers (30 cm);
- legs (29 cm)
- seat (35 cm).
 Each type of parts is four pieces. Supports should be cut out of the timber. The diagram details the dimensions of individual parts of the structure, as well as the parameters for creating grooves. In this project, spike connections are provided, so you need to cut them with extreme precision.
All fasteners are first advised to be lubricated with glue and only then to fasten the screws.
Chair with back
Chairs made of wood with a backrest are especially popular. However, making them is much more difficult than a stool. It all starts with the following:
- Preparing the legs. Two beams 44 cm long will serve as the front bases, and the other 2 80 cm long will serve as the back ones.
- Forming grooves (two on each side) for fastening. The depth is 1.5 or 2 cm, and the width is up to 4 cm. They should be located exactly opposite each other.
- Upgraded items. The edge of the legs can be cut off slightly both at the top and at the bottom. You can cut the timber obliquely slightly above the center, connecting the parts so that you get an angle.
- Legs. At the ends of the prepared four strips (length - 35 cm) spikes are cut (1 cm). This must be done in such a way that they fit very tightly during assembly.
- Back. It can be made of 2-3 vertical beams, 42 cm long. It is imperative to form grooves.
The same principle can be used to assemble wooden chairs. A distinctive feature of the proposed dacha accessory will be the armrests and "skis" at the base of the legs, which are necessary for swinging. In this case, such elements are attached last. Many online stores sell ready-made parts that only need to be assembled.
Kitchen utensils
During use, wooden countertops often become unusable. Spots, irregularities or defects spoil the entire kitchen interior. Then the owner has a choice: buy new ones or make them himself. The first option attracts with its simplicity, but the second - with its economy and creativity. After all, a man only needs:
- Take measurements, providing areas for the sink and stove. It is also important to correctly calculate the corner area.
- Determine how the parts are connected. Some just stick them, but this is unreliable in places where moisture accumulates. Therefore, it is worth using the thorn-groove technology. Recesses are cut from the front side. For thick structures, they should be from 10 to 12 mm, and for thin ones - up to 8 mm. In another case, you can take a groove edge as a basis, according to the lining principle. A recess is made on one side of the board, and a strip in the form of a comb is glued on the other.
- Protective border. Two beams of 1.5 m are taken. They should be given the desired shape on one side, and with the arc, make grooves to fit the bar. When connecting, the lining must protrude 1 mm from the main shield.
- Finishing sanding, priming and painting.
When the worktop is installed on the base of the kitchen unit, it is important to carefully seal the joint between the structure and the wall. A special plastic or wooden plank will look perfect in this place. Such a border is fastened with a sealant. The seal can be made in the form of a silicone strip. From the remaining materials, the craftsman will get a vintage wood cutting board that can be cut into a fancy shape. In this case, it is important to grind off all bends and corners.
The processing of the boards and the shield is carried out twice: before and after installation.
Street exhibits
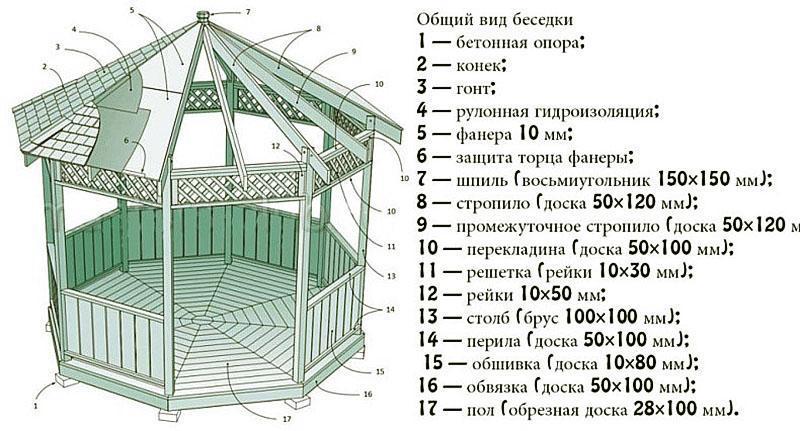
There is no more suitable place for a wooden gazebo like a beautiful garden in the country. It looks especially amazing in dense thickets wild grapes or a climbing rose. You can make this cozy corner for relaxation according to the following plan:
- Determine design and dimensions gazebos (height 2.5 m, width 3 m, and the shape is square).
- Design the roof, foundations and walls of the structure.
- Laying the foundation. It will consist of stems located at four corners. To these should be added one on each side and one in the center. As a result, there should be 9 supports. For the strength of the structure in the corner masonry (5 rows of bricks), install rods of 40 cm, which are only half deepened into the soil.Along the perimeter and in the central zone, a base of beams (3 m) should be arrived using a "half-tree" connection.
- Frame. Support pillars are attached to each corner with reinforcing pins. Don't forget to adjust the level. In the upper part of the support, a recess is cut (4 by 10 cm), on which the rafters will be fixed.
- Roof. The crosspiece consists of two planks connected by a diagonal bundle. At the end of each board, a cut is made according to the size of the cuts on the supports. After installing the base, a strapping is made of beams, as well as a railing at a distance of 1 m from the ground. The roof shape can be made as two- or multi-slope.
- Decor. Embossed wooden balusters look beautiful not only on the steps of luxurious mansions, but also in cozy gazebos. They are attached to the railing with pins, screws or dowels. The table and benches are set conscientiously so that they do not move.
Then finishing work is carried out on finishing. Each bend and detail of a wood product must be treated with an antiseptic, and after drying, thoroughly cleaned. If all these works are carried out correctly, taking into account the above recommendations, then such structures will last more than one decade.